¶ BPI-F4 Introduction
Banana Pi BPI-F4 industrial control board design with Sunplus SP7350 Quad ARM Cortex-A55 and 4.1 Tops NPU,It forms a 4.1 TOPS AI platform with a wide range of I/O options for interfacing with external devices. It offers a compact and robust environment, enabling customers to develop their own AI software and applications
BPI-F4 is an official open source hardware development board jointly developed by banana Pi open source community and Sunplus
| More Infomation: Banana Pi BPI-F4 |
¶ Prepare
¶ Tool Preparation
-
BPI-F4 core board and base board
-
Power supply: The DC Jack plug diameter is 5.5mm
-
The adapter power supply current must be greater than 1A.
-
-
System installation (choose one)
-
MicroSD /TF card boot
-
MicroSD card/TF, Class 10 or above, at least 8GB SDHC and a card reader
-
High speed TF cards tested by the ArmSoM team:
-
SanDisk 32GB TF (MicroSD) (developer recommended)
-
SanDisk 32GB TF (MicroSD) Dashcam & Security Camera Storage Card (recommended for long-term operation)
-
Sandisk TF 8G Class10 microSD
-
Sandisk TF 128G Class10 microSD XC TF 128G 48MB/S:
-
-
-
Onboard eMMC boot
-
¶ Optional Accessories
-
USB keyboard and mouse
-
HDMI display and HDMI cable
-
BPI-F4 Supports 1080p, 720p, 480p resolutions
-
-
Ethernet cable
-
BPI-F4 Supports 10M/100M/1000M transmission
-
The network cable is used to connect BPI-F4 to a local network and the Internet
-
-
Camera module
-
BPI-F4 supports camera function
-
We recommend using the ov5647
-
-
LCD display
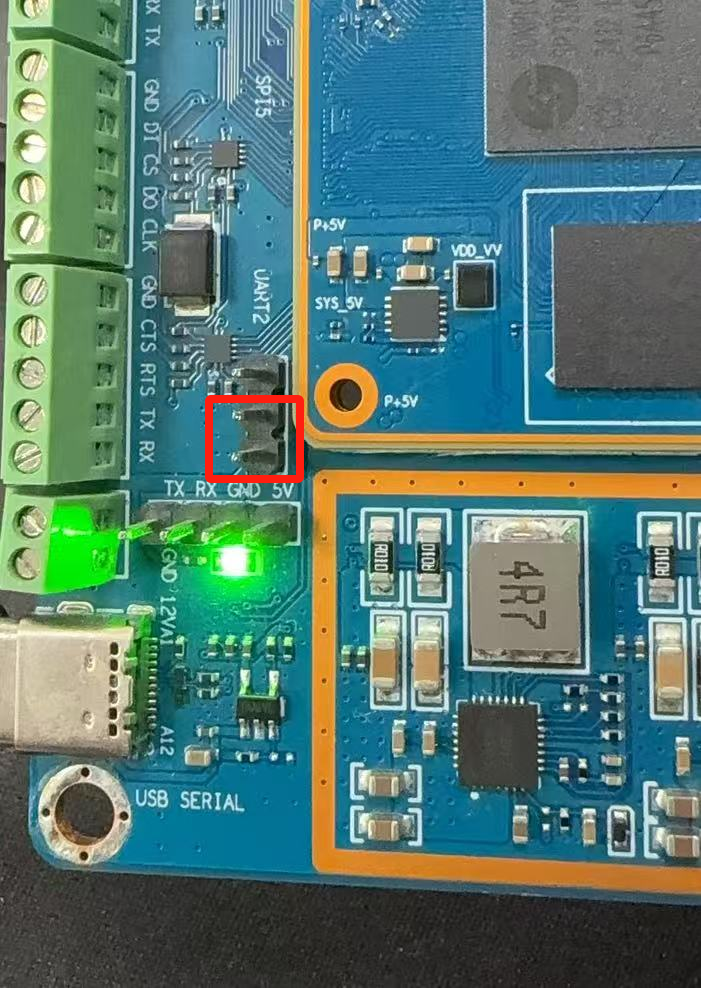
¶ Jumper Setting
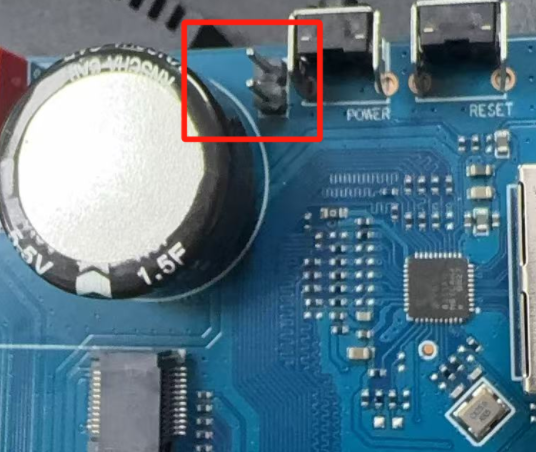
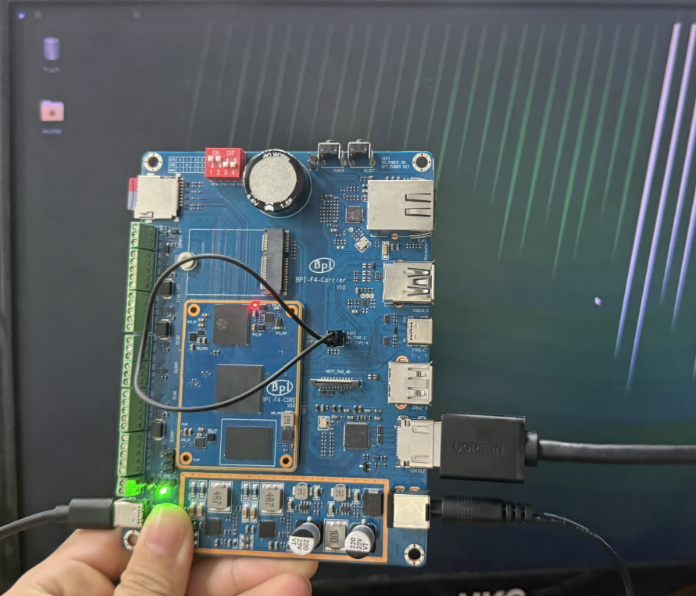
Plug in a jumper to turn on power automatically. Otherwise, required to press Wake-up key for 1 second to turn on power.
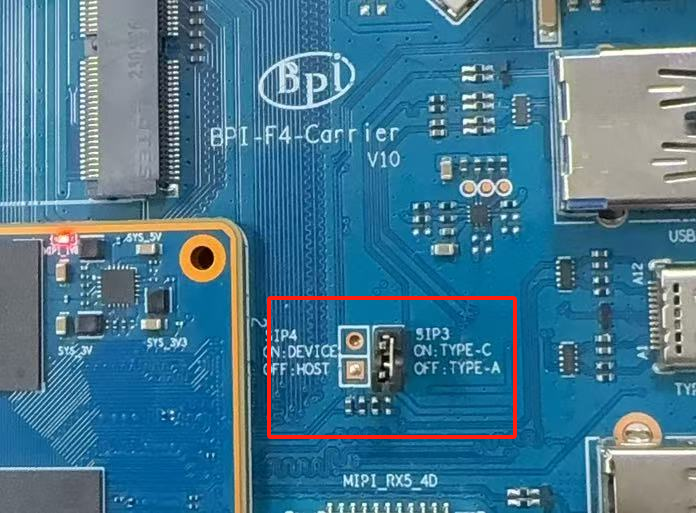
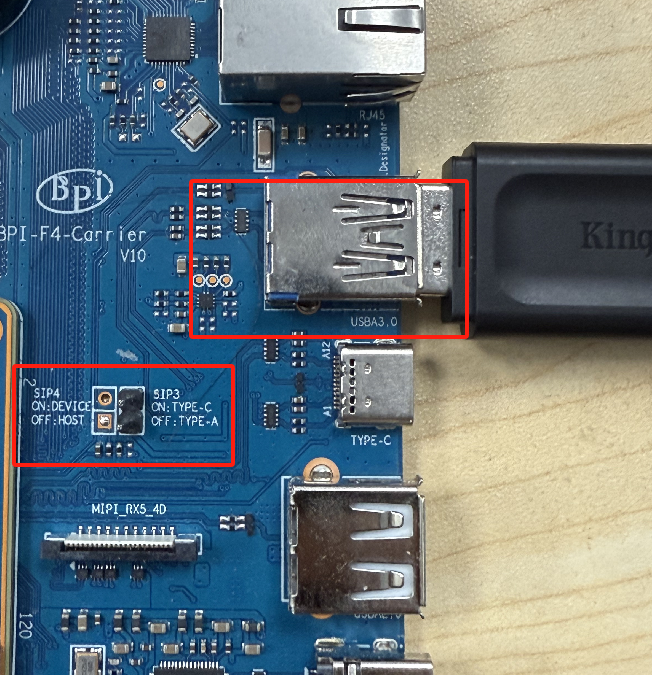
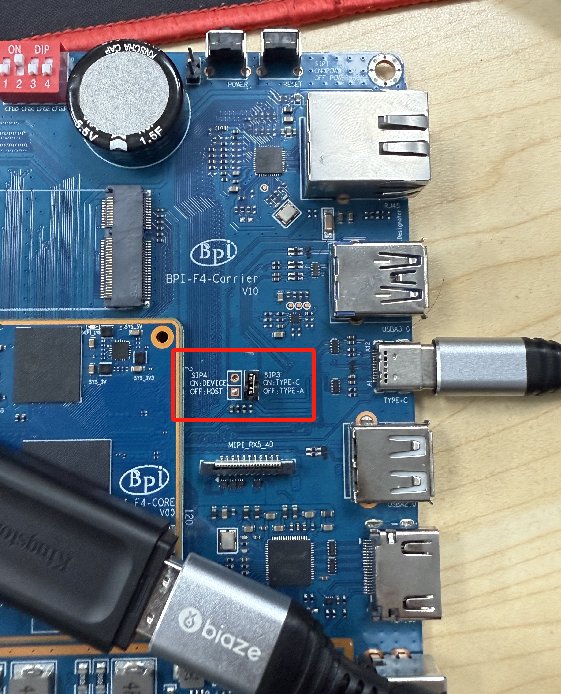
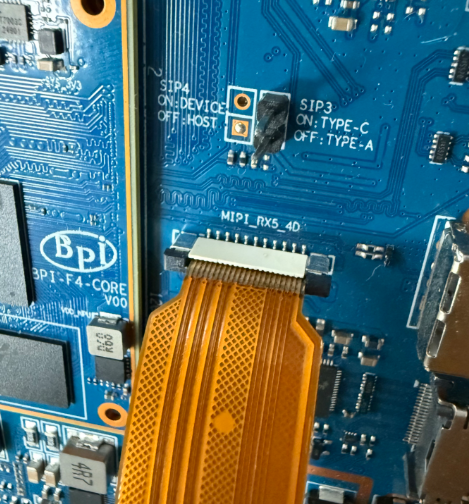
Plug in a jumper to select USB 3.0 Type C socket.Otherwise, USB 3.0 Type A socket is selected.
Voltage Selection Jumper3.3V
Voltage Selection Jumper5.0V
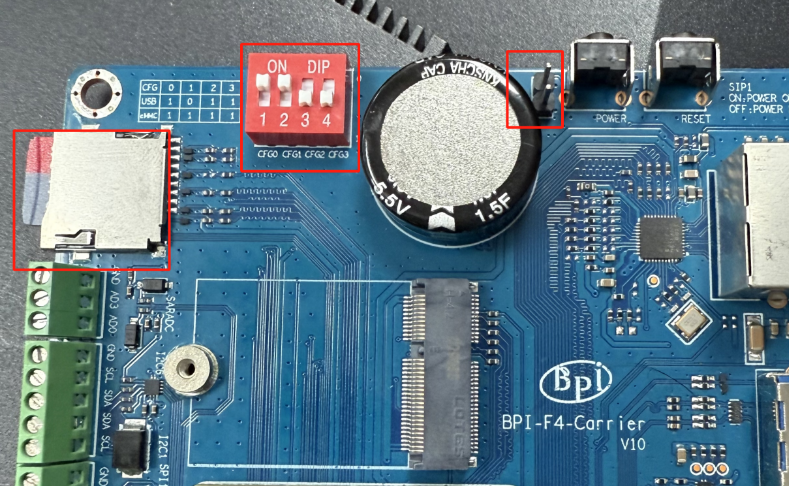
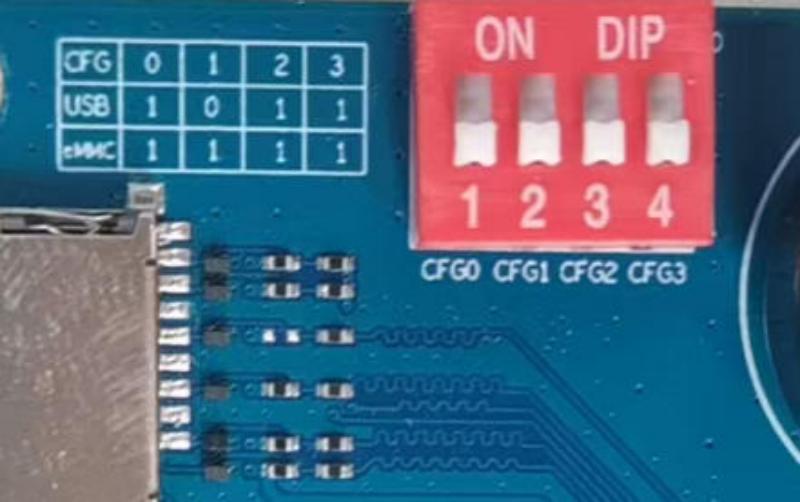
¶ boot select
| Boot Devices | 1 | 2 | 3 | 4 |
|---|---|---|---|---|
eMMC Boot |
1 |
1 |
1 |
1 |
SDC Boot/ ISP |
1 |
1 |
0 |
0 |
USB ISP |
1 |
1 |
0 |
1 |
For example:The picture below shows to boot from an SD card

¶ Linux
¶ Install Image to sd card
|
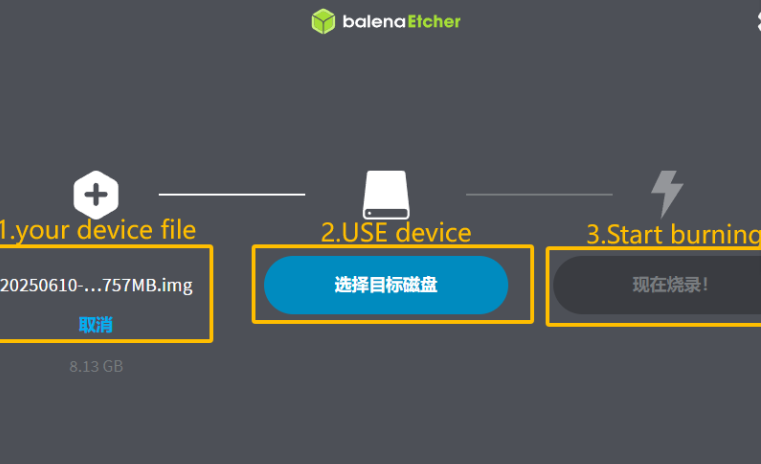
Use this method for Ubuntu images.
Install Image with Balena Etcher. Balena Etcher is an opensource GUI flash tool by Balena, Flash OS images to SDcard or USB drive. |
-
Click on "Flash from file" to select image.
-
Click on "Select target" to select USB device.
-
Click on "Flash!" Start burning.
-
To boot from an SD card, adjust the boot switch to [1 1 0 0]
-
Insert your SD card into the micro SD card socket.
-
Plug in a jumper to turn on power automatically. Otherwise, required to press Wake-up key for 1 second to turn on power.
| Please connect the HDMI monitor when desktop mirroring is started. You need to create a user on the desktop. |
¶ Install Image to eMMC
First, check whether the USB flash drive’s file system is FAT32 or FAT16.
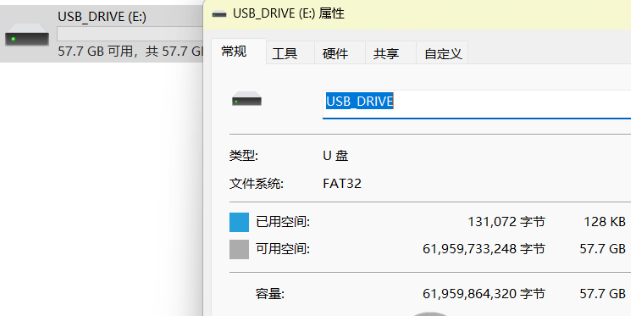
If not, you can use the following command to convert it. If it is FAT32 or FAT16, you can skip this step.
sudo umount /dev/sdb1
sudo mkfs.vfat -F 32 -n "DATA" /dev/sdb1Extract the downloaded emmc image file to a USB flash drive
switch the key to USB

The USB flash drive can be used for upgrading when inserted into USB3 TYPE-A, TYPE-C, and USB2 TYPE-A ports.
Insert the USB flash drive into the USB3 TYPE-A port (no need to short-circuit the jumper).
Insert the USB flash drive into the USB3 Type-C port (use the TYPE-C port; the jumper must be short-circuited here)
Insert the USB flash drive into the USB 2.0 Type-A port.
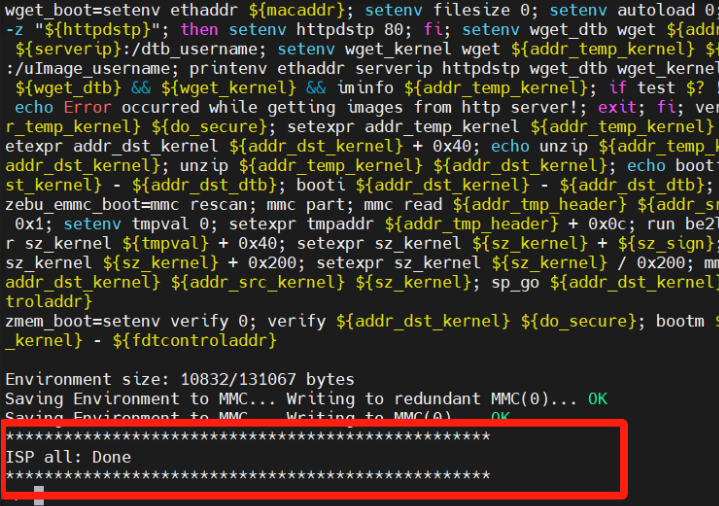
After power-on, it will automatically enter the upgrade process. The log after the upgrade is complete is as follows:
After the burning is completed, turn off the power, change the dip switch to 1111, and power on again to boot from eMMC.
¶ install and use the smzf AI model framework
-
1.First, confirm that you have sufficient storage space
df -h-
2.Retrieve the content from Github
git clone https://github.com/sunplus-plus1/smzf.git -b master
cd smzf-
3.Pulling submodules uses SSH by default. I haven’t configured a key, so I need to change it to HTTPS
nano .gitmodulesModify the two URLs:
url = https://github.com/sunplus-plus1/nnthirdparty.git
url = https://github.com/sunplus-plus1/model-zoo.git-
4.Next, pull the submodules
git submodule sync --recursive
git submodule update --init --recursive --remote-
5.Modify DNS
sudo nano /etc/resolv.conf

#Add the following content:
nameserver 8.8.8.8-
6.Install CMake
sudo apt update
sudo apt install cmake-
7.Unzip the three files
cd ./nnthirdparty/libtorch
tar -xzf libtorch.tar.gz

cd ..
cd ffmpeg/
tar -xzf 9.2.tar.gz

cd ..
cd opencv/
tar -xzf 4.2.tar.gz-
8.After decompression
cd ..
cd ..
./build.sh --c3v-
9.Enter the release directory and use ldd to find missing dependencies
export LD_LIBRARY_PATH=$(pwd)/lib:$(pwd)/nnthirdparty/jsoncpp/lib:$(pwd)/nnthirdparty/NADKLogger/lib:$(pwd)/nnthirdparty/NADKRoutines/lib:$(pwd)/nnthirdparty/nnbase/lib:$(pwd)/nnthirdparty/libtorch/lib:$LD_LIBRARY_PATH-
10.Start using the AI model. Here, we use camera image detection as an example
./bin/nnModel -m Yolo11sDetectionHybridI8 -v /dev/video42¶ Heat Dissipation Summary
¶ Core board heat dissipation
The heat sink we use is the same size and specification as the one used with the Raspberry Pi CM4, which can effectively solve its heating problem and ensure the stable operation of the device.
| Component | Bare Board | CPUBare Board | DDRBare Board eMMC | With Heat Sink |
|---|---|---|---|---|
Temperature after 5 minutes of testing |
81.4°C |
66.8°C |
60.9°C |
55.7°C |
Temperature at end of testing |
79.8°C |
64.7°C |
59.5°C |
52.6°C |
| Based on the test temperatures, it can be observed that the temperature with a heat sink is 10-20°C lower than that of the bare board. |
¶ AI model heat dissipation
| AI Workload | Bare Board CPU | Bare Board DDR | Bare Board eMMC | With Heat Sink |
|---|---|---|---|---|
Camera AI Recognition |
69.5°C |
59.0°C |
54.3°C |
51.2°C |
Video AI Recognition |
95.9°C |
75.3°C |
66.8°C |
61.2°C |
| The cooling effect of the heat sink is significantly more pronounced during AI model execution. Temperatures with the heat sink are 10-30°C lower compared to the bare board configuration. |
¶ Interface Settings
If you are using Banana Pi BPI-F4 Pro for the first time, please familiarize yourself with the Peripheral Interfaces for better understanding of the following content.
¶ Ethernet Port
-
1.First, plug one end of the network cable into the Ethernet port, and connect the other end to a router. Ensure that the network is functional.
-
2.After the system boots, it will automatically assign an IP address to the Ethernet port without any additional configuration.
-
3.To check the IP address, use the following command:
pi@ubuntu:~$ ifconfig
eth0: flags=4163<UP,BROADCAST,RUNNING,MULTICAST>  mtu 1500
        inet 192.168.1.114  netmask 255.255.255.0  broadcast 192.168.1.255
        inet6 fe80::a8ef:1ac3:d737:32b9  prefixlen 64  scopeid 0x20<link>
        ether 1c:50:1e:f1:d4:f7  txqueuelen 1000  (Ethernet)
        RX packets 49156  bytes 72810833 (72.8 MB)
        RX errors 0  dropped 0  overruns 0  frame 0
        TX packets 7994  bytes 617977 (617.9 KB)
        TX errors 0  dropped 0 overruns 0  carrier 0  collisions 0
        device interrupt 38  base 0xa000

lo: flags=73<UP,LOOPBACK,RUNNING>  mtu 65536
        inet 127.0.0.1  netmask 255.0.0.0
        inet6 ::1  prefixlen 128  scopeid 0x10<host>
        loop  txqueuelen 1000  (Local Loopback)
        RX packets 260  bytes 24520 (24.5 KB)
        RX errors 0  dropped 0  overruns 0  frame 0
        TX packets 260  bytes 24520 (24.5 KB)
TX errors 0 dropped 0 overruns 0 carrier 0 collisions 0-
4.Use the ping tool to check network connectivity.
-
The command to test network connectivity is shown below. You can stop the ping command with the Ctrl+C shortcut.
-
pi@ubuntu:~$ sudo ping www.baidu.com
PING www.a.shifen.com (183.2.172.177) 56(84) bytes of data.
64 bytes from 183.2.172.177: icmp_seq=1 ttl=52 time=9.10 ms
64 bytes from 183.2.172.177: icmp_seq=2 ttl=52 time=10.6 ms
64 bytes from 183.2.172.177: icmp_seq=3 ttl=52 time=9.07 ms
64 bytes from 183.2.172.177: icmp_seq=4 ttl=52 time=9.23 ms
64 bytes from 183.2.172.177: icmp_seq=5 ttl=52 time=8.85 ms
64 bytes from 183.2.172.177: icmp_seq=6 ttl=52 time=8.85 ms
64 bytes from 183.2.172.177: icmp_seq=7 ttl=52 time=9.26 ms
^C
--- www.a.shifen.com ping statistics ---
7 packets transmitted, 7 received, 0% packet loss, time 6010ms
rtt min/avg/max/mdev = 8.845/9.276/10.566/0.548 ms¶ WIFI
¶ Connecting to WIFI via Command Line on Server Image
1.First…
2.Use the nmcli dev wifi command to scan for available WIFI hotspots:
-
Enable WIFI
nmcli r wifi on-
Scan for WIFI
nmcli dev wifi-
Connect to a WIFI network
nmcli dev wifi connect "wifi_name" password "wifi_password"¶ Testing Method for Desktop Image
1.Click the network configuration icon on the desktop (ensure not to connect a network cable while testing WIFI).
2.After connecting to WIFI, open a browser to check if you can access the internet
¶ BT
¶ HDMI
| HDMI output interface | Supports 1080p, 720p, 480p resolutions |
|---|
Connect the board to an HDMI display using an HDMI cable.
After booting the Linux system, if the HDMI display shows an image, the HDMI interface is functioning correctly.
| that many laptops, while having HDMI ports, typically have HDMI output only and do not support HDMI in. This means you cannot display the HDMI output from another device on the laptop’s screen. Before connecting the development board’s HDMI to a laptop’s HDMI port, ensure your laptop supports HDMI in functionality. If there is no display, first check if your system is a desktop version; server versions might only show a terminal. |
-
1.HDMI to VGA Display Test
-
Required accessories: HDMI to VGA converter
-
-
2.A VGA cable and a display with a VGA port
The HDMI to VGA display test is shown below:
¶ USB
The BPI-F4 provides one USB 3.0 Type-A, one USB 3.0 Type-C and one USB 2.0 Type-A.
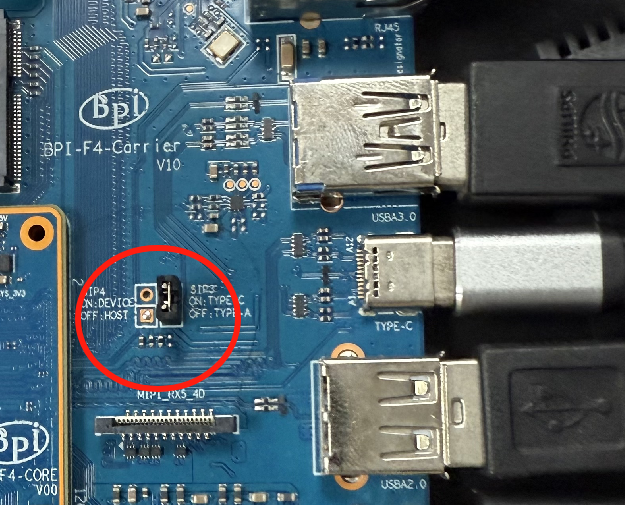
| Note that USB 3.0 Type-A and Type-C share with the same USB 3.0 port of SP7350, and they cannot be used simultaneously. Plug in a jumper to select USB 3.0 Type C socket.Otherwise, USB 3.0 Type A socket is selected. |
¶ Using USB Mouse or Keyboard
-
1.Insert a USB keyboard or mouse into the board’s USB port.
-
2.Connect the board to an HDMI display.
-
3.If the mouse or keyboard operates the system normally, the USB interface is working correctly (the mouse will only work in desktop versions of the system).
¶ Using USB Storage Device
-
1.Insert a USB flash drive or USB external hard drive into the product’s USB port.
-
2.Run the following command; if you see sdX output, the USB drive is recognized successfully: insertpng
sunplus@ubuntu:~$ cat /proc/partitions | grep "sd*"
major minor  #blocks  name
8 0 3932160 sda-
3.Use the mount command to mount the USB drive to /mnt and view the files on the USB drive: insertpng
sunplus@ubuntu:/dev$ sudo mkdir /test
sunplus@ubuntu:/dev$ sudo mount /dev/sda /test/-
4.After mounting, use the df -h command to check the USB drive’s capacity usage and mount point: insertpng
sunplus@ubuntu:/dev$ df -h | grep "sd"
/dev/sda 3.8G 16K 3.8G 1% /test¶ Camera Ov5647
Required accessories:Video Camera OV5647
| OV5647 Specification | |
|---|---|
photograph resolution |
5MP Max photograph resolution (2592 x 1944 = 5,038,848 pixels) Pixel Size |
1.4 x 1.4 μm Optical size |
1/4" Lens |
f=3.6 mm, f/2.9 Viewing Angle |
54° x 41° Max video resolution |
1080p@30fps Max frame rate |
480p@90fps Maximum exposure times (seconds) |
0.97 Selectable video resolutions: |
1080p@30fps, 720p@60fps, 480p@90fps |
The camera uses the OV5647. After connecting and powering on the camera module, Use v4l2-ctl --all --device /dev/video0 command getting device all information(Note: Ensure it is not connected backwards; the gold fingers must face the jumper cap)
pi@ubuntu:~$ v4l2-ctl --all --device /dev/video42
Driver Info:
        Driver name      : sp_vin
        Card type        : SP_VIN
        Bus info         : platform:f8005a80.video
        Driver version   : 6.6.47
        Capabilities     : 0xa5200001
                Video Capture
                I/O MC
                Read/Write
                Streaming
                Extended Pix Format
                Device Capabilities
        Device Caps      : 0x25200001
                Video Capture
                I/O MC
                Read/Write
                Streaming
                Extended Pix Format
Media Driver Info:
        Driver name      : sp_vin
        Model            : sunplus,sp7350-vin
        Serial           :
        Bus info         : platform:f8005a80.video
        Media version    : 6.6.47
        Hardware revision: 0x00000000 (0)
        Driver version   : 6.6.47
Interface Info:
        ID               : 0x03000011
        Type             : V4L Video
Entity Info:
        ID               : 0x0000000f (15)
        Name             : VIN10 output
        Function         : V4L2 I/O
        Pad 0x01000010   : 0: Sink
          Link 0x02000013: from remote pad 0x1000003 of entity 'sp_csi2 f8005500.csirx' (Video Pixel Formatter): Data, Enabled
Priority: 2
Video input : 0 (VIN10 output: ok)
Format Video Capture:
        Width/Height      : 1920/1080
        Pixel Format      : 'pGAA' (10-bit Bayer GBGB/RGRG Packed)
        Field             : None
        Bytes per Line    : 2400
        Size Image        : 2592000
        Colorspace        : Raw
        Transfer Function : Default (maps to None)
        YCbCr/HSV Encoding: Default (maps to ITU-R 601)
        Quantization      : Default (maps to Full Range)
        Flags             :

User Controls

        white_balance_automatic 0x0098090c (bool)   : default=0 value=1
                       exposure 0x00980911 (int)    : min=4 max=1100 step=1 default=1000 value=980
                 gain_automatic 0x00980912 (bool)   : default=0 value=1
                horizontal_flip 0x00980914 (bool)   : default=0 value=0 flags=modify-layout
                  vertical_flip 0x00980915 (bool)   : default=0 value=0 flags=modify-layout
                alpha_component 0x00980929 (int)    : min=0 max=255 step=1 default=255 value=255

Camera Controls

                  auto_exposure 0x009a0901 (menu)   : min=0 max=1 default=1 value=1 (Manual Mode)
                                0: Auto Mode
                                1: Manual Mode

Image Source Controls

              vertical_blanking 0x009e0901 (int)    : min=24 max=31687 step=1 default=24 value=24
            horizontal_blanking 0x009e0902 (int)    : min=496 max=496 step=1 default=496 value=496 flags=read-only
                  analogue_gain 0x009e0903 (int)    : min=16 max=1023 step=1 default=32 value=32

Image Processing Controls

pixel_rate 0x009f0902 (int64) : min=81666700 max=81666700 step=1 default=81666700 value=81666700 flags=read-onlyUse v4l2-ctl -d /dev/video42 --set-ctrl params=value setting device controls.
Enable auto_exposure:
v4l2-ctl -d /dev/video42 --set-ctrl auto_exposure=1Enable gain_automatic
v4l2-ctl -d /dev/video42 --set-ctrl gain_automatic=1Enable white_balance_automatic
v4l2-ctl -d /dev/video42 --set-ctrl white_balance_automatic=1Use querying device video format
pi@ubuntu:~$ v4l2-ctl --list-formats-ext --device /dev/video42
ioctl: VIDIOC_ENUM_FMT
        Type: Video Capture

        [0]: 'GBRG' (8-bit Bayer GBGB/RGRG)
                Size: Discrete 640x480
        [1]: 'GB10' (10-bit Bayer GBGB/RGRG)
                Size: Discrete 2592x1944
                Size: Discrete 1920x1080
                Size: Discrete 1296x972
                Size: Discrete 640x480
        [2]: 'pGAA' (10-bit Bayer GBGB/RGRG Packed)
                Size: Discrete 2592x1944
                Size: Discrete 1920x1080
                Size: Discrete 1296x972
Size: Discrete 640x480¶ capture image then to open image
Use v4l2-ctl for image capture:
pi@ubuntu:~$ v4l2-ctl -d /dev/video42 --set-fmt-video=width=1920,height=1080,pixelformat=pGAA --stream-mmap=3 --stream-to=/home/sunplus/Videos/ov5647.raw --stream-skip=9 --stream-count=1
<<<<<<<<<<<<<<<<<<<<
pi@ubuntu:~$Insert the USB flash drive and mount it, then copy the generated OV5647.RAW file to the USB flash drive
pi@ubuntu:~$ lsblk
NAME         MAJ:MIN RM  SIZE RO TYPE MOUNTPOINTS
sda            8:0    1 57.7G  0 disk
└─sda1         8:1    1 57.7G  0 part
mmcblk1      179:0    0 14.8G  0 disk
├─mmcblk1p1  179:1    0  256M  0 part
└─mmcblk1p2  179:2    0 14.6G  0 part /
mmcblk0      179:8    0 29.2G  0 disk
mmcblk0boot0 179:16   0    4M  1 disk
mmcblk0boot1 179:24   0    4M  1 disk
pi@ubuntu:~$ mount /dev/sda1 /mnt/usb
pi@ubuntu:~$ cp /home/sunplus/Videos/ov5647-111.raw /mnt/usb
pi@ubuntu:~$ll /mnt/usb
total 2596
drwxr-xr-x 2 root root   32768 Jan  1 1970  ./
drwxr-xr-x 4 root root    4096 Aug 21 22:31 ../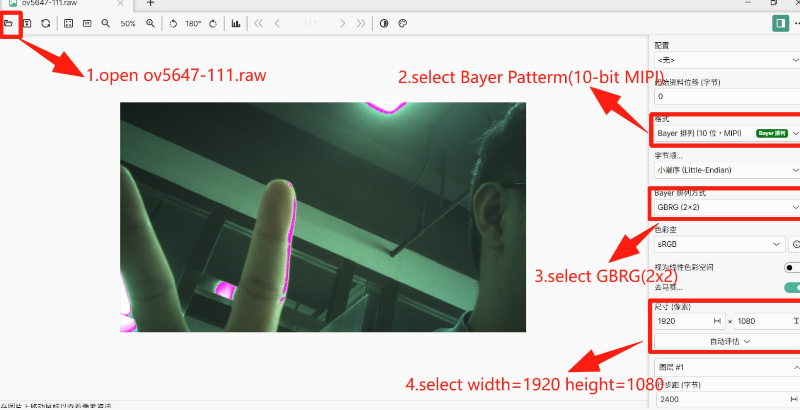
-rwxr-xr-x 1 root root 2592000 Aug 21 23:13 ov5647-111.raw*Download raw image viewer from PixelViewer | Carina Studio
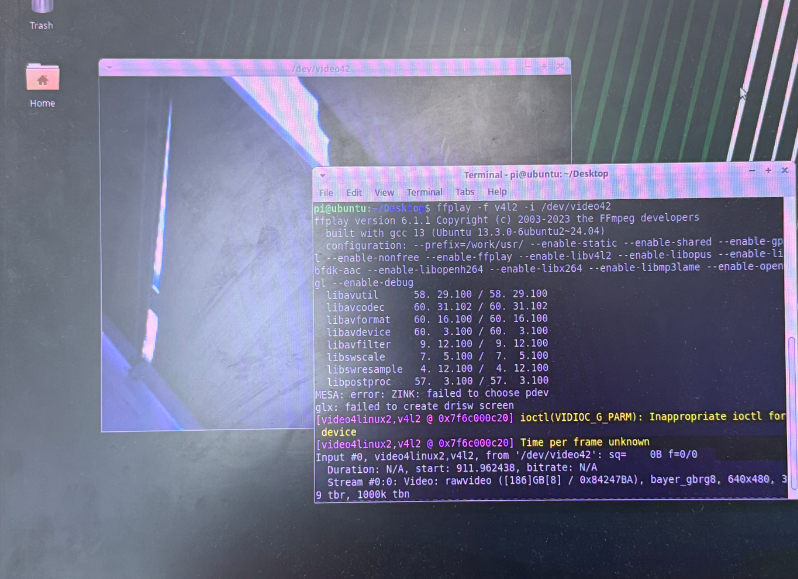
¶ Initiate real-time video recording with the OV5647 camera module
First, connect the OV5647 camera to the F4 board
Then power up and start the system. If this is your first time using the OV5647 camera, execute the following command; otherwise, you may skip this step.
sudo apt update
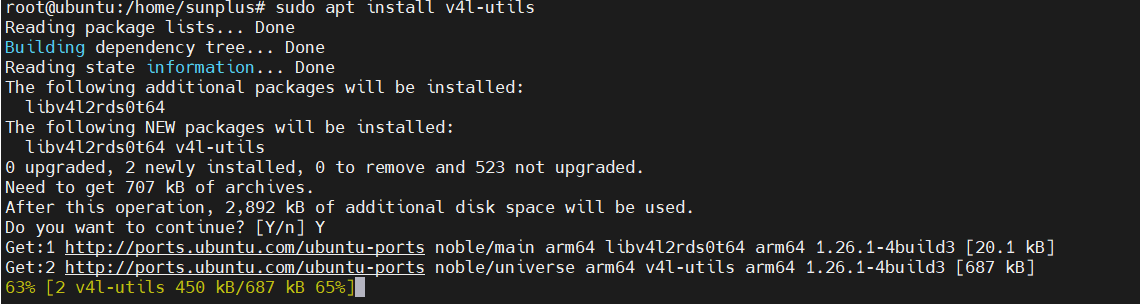
sudo apt install v4l-utils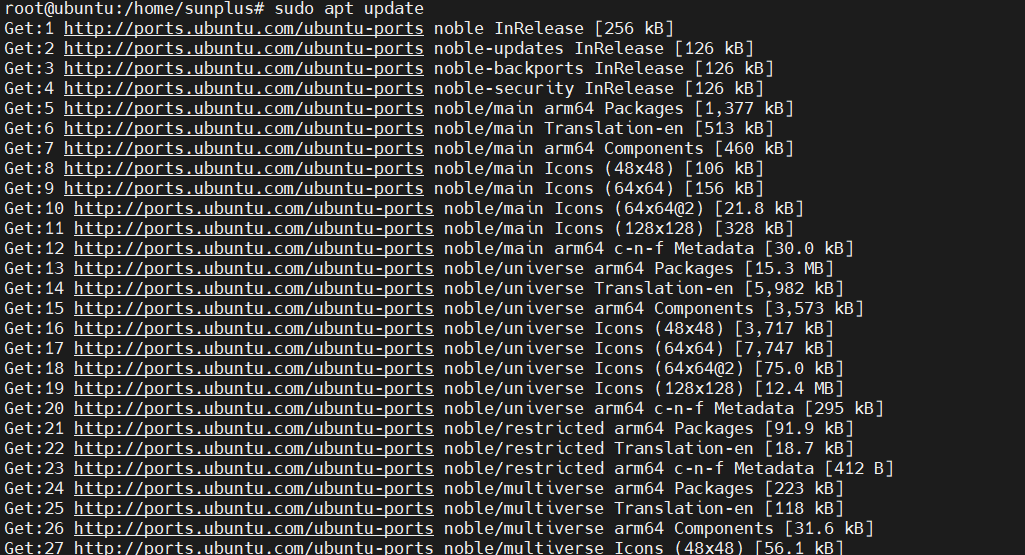
Connect via HDMI, launch the terminal in Ubuntu desktop mode, and enter the following command to activate the OV5647 camera
ffplay -f v4l2 -i /dev/video42