¶ BPI-F4 Introduction
Banana Pi BPI-F4 industrial control board design with Sunplus SP7350 Quad ARM Cortex-A55 and 4.1 Tops NPU,It forms a 4.1 TOPS AI platform with a wide range of I/O options for interfacing with external devices. It offers a compact and robust environment, enabling customers to develop their own AI software and applications
BPI-F4 is an official open source hardware development board jointly developed by banana Pi open source community and Sunplus
| More Infomation: Banana Pi BPI-F4 |
¶ Linux
¶ Install Image to sd card
|
Use this method for Ubuntu and Armbian images.
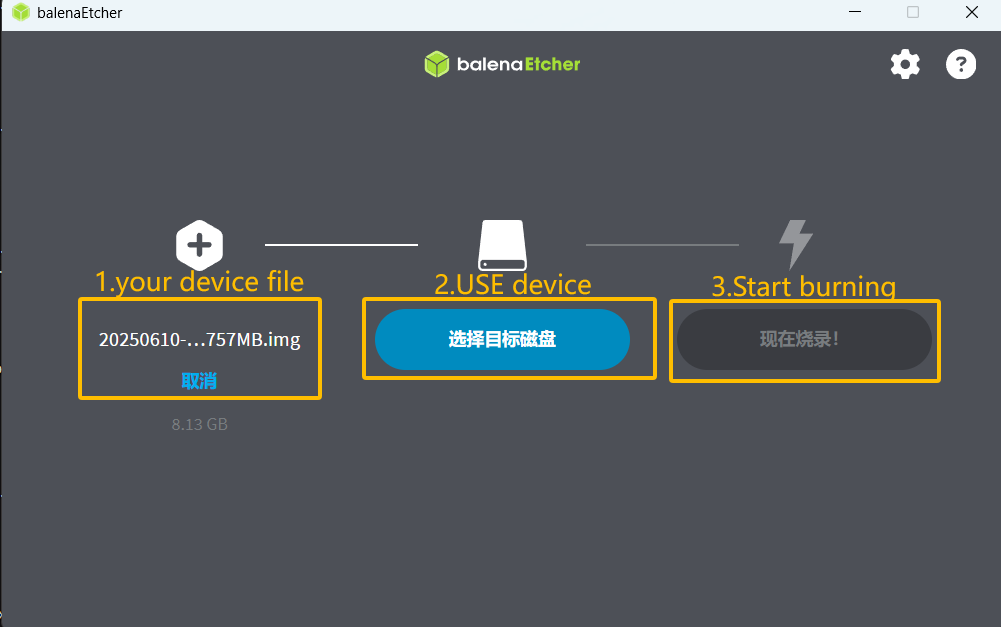
Install Image with Balena Etcher. Balena Etcher is an opensource GUI flash tool by Balena, Flash OS images to SDcard or USB drive. |
-
Click on "Flash from file" to select image.
-
Click on "Select target" to select USB device.
-
Click on "Flash!" Start burning.
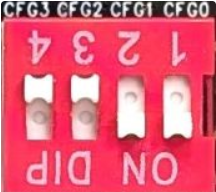
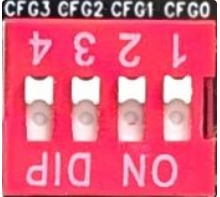
To boot from an SD card, adjust the boot switch to [1 1 0 0]
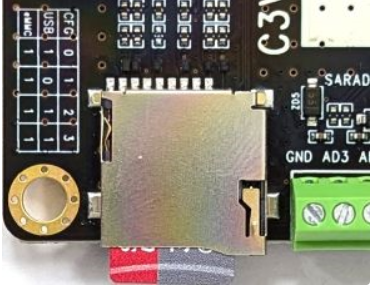
Insert your SD card into the micro SD card socket. Then press the power button, if there is still no response, press the RST button.
| Please connect the HDMI monitor when desktop mirroring is started. You need to create a user on the desktop. |
¶ Install Image to eMMC
| Please prepare an SD card with the image burned.And a USB drive containing image. |
To boot from the on-board eMMC device, set the boot switch configuration to [1 1 1 1]
¶ Interface Settings
If you are using Banana Pi BPI-F4 Pro for the first time, please familiarize yourself with the Peripheral Interfaces for better understanding of the following content.
¶ Ethernet Port
-
1.First, plug one end of the network cable into the Ethernet port, and connect the other end to a router. Ensure that the network is functional.
-
2.After the system boots, it will automatically assign an IP address to the Ethernet port without any additional configuration.
-
3.To check the IP address, use the following command:
pi@ubuntu:~$ ifconfig
eth0: flags=4163<UP,BROADCAST,RUNNING,MULTICAST>  mtu 1500
        inet 192.168.1.114  netmask 255.255.255.0  broadcast 192.168.1.255
        inet6 fe80::a8ef:1ac3:d737:32b9  prefixlen 64  scopeid 0x20<link>
        ether 1c:50:1e:f1:d4:f7  txqueuelen 1000  (Ethernet)
        RX packets 49156  bytes 72810833 (72.8 MB)
        RX errors 0  dropped 0  overruns 0  frame 0
        TX packets 7994  bytes 617977 (617.9 KB)
        TX errors 0  dropped 0 overruns 0  carrier 0  collisions 0
        device interrupt 38  base 0xa000

lo: flags=73<UP,LOOPBACK,RUNNING>  mtu 65536
        inet 127.0.0.1  netmask 255.0.0.0
        inet6 ::1  prefixlen 128  scopeid 0x10<host>
        loop  txqueuelen 1000  (Local Loopback)
        RX packets 260  bytes 24520 (24.5 KB)
        RX errors 0  dropped 0  overruns 0  frame 0
        TX packets 260  bytes 24520 (24.5 KB)
TX errors 0 dropped 0 overruns 0 carrier 0 collisions 0-
4.Use the ping tool to check network connectivity.
-
The command to test network connectivity is shown below. You can stop the ping command with the Ctrl+C shortcut.
-
pi@ubuntu:~$ sudo ping www.baidu.com
PING www.a.shifen.com (183.2.172.177) 56(84) bytes of data.
64 bytes from 183.2.172.177: icmp_seq=1 ttl=52 time=9.10 ms
64 bytes from 183.2.172.177: icmp_seq=2 ttl=52 time=10.6 ms
64 bytes from 183.2.172.177: icmp_seq=3 ttl=52 time=9.07 ms
64 bytes from 183.2.172.177: icmp_seq=4 ttl=52 time=9.23 ms
64 bytes from 183.2.172.177: icmp_seq=5 ttl=52 time=8.85 ms
64 bytes from 183.2.172.177: icmp_seq=6 ttl=52 time=8.85 ms
64 bytes from 183.2.172.177: icmp_seq=7 ttl=52 time=9.26 ms
^C
--- www.a.shifen.com ping statistics ---
7 packets transmitted, 7 received, 0% packet loss, time 6010ms
rtt min/avg/max/mdev = 8.845/9.276/10.566/0.548 ms¶ WIFI
¶ Connecting to WIFI via Command Line on Server Image
1.First…
2.Use the nmcli dev wifi command to scan for available WIFI hotspots:
-
Enable WIFI
nmcli r wifi on-
Scan for WIFI
nmcli dev wifi-
Connect to a WIFI network
nmcli dev wifi connect "wifi_name" password "wifi_password"¶ Testing Method for Desktop Image
1.Click the network configuration icon on the desktop (ensure not to connect a network cable while testing WIFI).
2.After connecting to WIFI, open a browser to check if you can access the internet
¶ BT
¶ HDMI
| HDMI output interface | Supports 1080p, 720p, 480p resolutions |
|---|
Connect the board to an HDMI display using an HDMI cable.
After booting the Linux system, if the HDMI display shows an image, the HDMI interface is functioning correctly.
| that many laptops, while having HDMI ports, typically have HDMI output only and do not support HDMI in. This means you cannot display the HDMI output from another device on the laptop’s screen. Before connecting the development board’s HDMI to a laptop’s HDMI port, ensure your laptop supports HDMI in functionality. If there is no display, first check if your system is a desktop version; server versions might only show a terminal. |
-
1.HDMI to VGA Display Test
-
Required accessories: HDMI to VGA converter
-
-
2.A VGA cable and a display with a VGA port
The HDMI to VGA display test is shown below:

¶ USB
The BPI-F4 Pro provides one USB 3.0 Type-A, one USB 3.0 Type-C and one USB 2.0 Type-A.
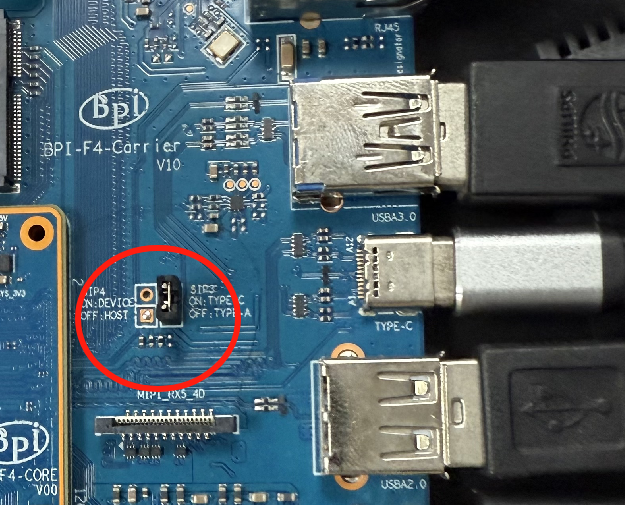
| Note that USB 3.0 Type-A and Type-C share with the same USB 3.0 port of SP7350, and they cannot be used simultaneously. Plug in a jumper to select USB 3.0 Type C socket.Otherwise, USB 3.0 Type A socket is selected. |
¶ Testing USB Mouse or Keyboard
-
1.Insert a USB keyboard or mouse into the board’s USB port.
-
2.Connect the board to an HDMI display.
-
3.If the mouse or keyboard operates the system normally, the USB interface is working correctly (the mouse will only work in desktop versions of the system).
¶ Testing USB Storage Device
-
1.Insert a USB flash drive or USB external hard drive into the product’s USB port.
-
2.Run the following command; if you see sdX output, the USB drive is recognized successfully: insertpng
sunplus@ubuntu:~$ cat /proc/partitions | grep "sd*"
major minor  #blocks  name
8 0 3932160 sda-
3.Use the mount command to mount the USB drive to /mnt and view the files on the USB drive: insertpng
sunplus@ubuntu:/dev$ sudo mkdir /test
sunplus@ubuntu:/dev$ sudo mount /dev/sda /test/-
4.After mounting, use the df -h command to check the USB drive’s capacity usage and mount point: insertpng
sunplus@ubuntu:/dev$ df -h | grep "sd"
/dev/sda 3.8G 16K 3.8G 1% /test¶ MIPI-CSI
Required accessories:Video Camera OV5647
| OV5647 Specification | |
|---|---|
photograph resolution |
5MP Max photograph resolution (2592 x 1944 = 5,038,848 pixels) Pixel Size |
1.4 x 1.4 μm Optical size |
1/4" Lens |
f=3.6 mm, f/2.9 Viewing Angle |
54° x 41° Max video resolution |
1080p@30fps Max frame rate |
480p@90fps Maximum exposure times (seconds) |
0.97 Selectable video resolutions: |
1080p@30fps, 720p@60fps, 480p@90fps |
¶ OV5647
The camera uses the OV5647. After connecting and powering on the camera module, Use v4l2-ctl --all --device /dev/video0 command getting device all information
pi@ubuntu:~$ v4l2-ctl --all --device /dev/video42
Driver Info:
        Driver name      : sp_vin
        Card type        : SP_VIN
        Bus info         : platform:f8005a80.video
        Driver version   : 6.6.47
        Capabilities     : 0xa5200001
                Video Capture
                I/O MC
                Read/Write
                Streaming
                Extended Pix Format
                Device Capabilities
        Device Caps      : 0x25200001
                Video Capture
                I/O MC
                Read/Write
                Streaming
                Extended Pix Format
Media Driver Info:
        Driver name      : sp_vin
        Model            : sunplus,sp7350-vin
        Serial           :
        Bus info         : platform:f8005a80.video
        Media version    : 6.6.47
        Hardware revision: 0x00000000 (0)
        Driver version   : 6.6.47
Interface Info:
        ID               : 0x03000011
        Type             : V4L Video
Entity Info:
        ID               : 0x0000000f (15)
        Name             : VIN10 output
        Function         : V4L2 I/O
        Pad 0x01000010   : 0: Sink
          Link 0x02000013: from remote pad 0x1000003 of entity 'sp_csi2 f8005500.csirx' (Video Pixel Formatter): Data, Enabled
Priority: 2
Video input : 0 (VIN10 output: ok)
Format Video Capture:
        Width/Height      : 1920/1080
        Pixel Format      : 'pGAA' (10-bit Bayer GBGB/RGRG Packed)
        Field             : None
        Bytes per Line    : 2400
        Size Image        : 2592000
        Colorspace        : Raw
        Transfer Function : Default (maps to None)
        YCbCr/HSV Encoding: Default (maps to ITU-R 601)
        Quantization      : Default (maps to Full Range)
        Flags             :

User Controls

        white_balance_automatic 0x0098090c (bool)   : default=0 value=1
                       exposure 0x00980911 (int)    : min=4 max=1100 step=1 default=1000 value=980
                 gain_automatic 0x00980912 (bool)   : default=0 value=1
                horizontal_flip 0x00980914 (bool)   : default=0 value=0 flags=modify-layout
                  vertical_flip 0x00980915 (bool)   : default=0 value=0 flags=modify-layout
                alpha_component 0x00980929 (int)    : min=0 max=255 step=1 default=255 value=255

Camera Controls

                  auto_exposure 0x009a0901 (menu)   : min=0 max=1 default=1 value=1 (Manual Mode)
                                0: Auto Mode
                                1: Manual Mode

Image Source Controls

              vertical_blanking 0x009e0901 (int)    : min=24 max=31687 step=1 default=24 value=24
            horizontal_blanking 0x009e0902 (int)    : min=496 max=496 step=1 default=496 value=496 flags=read-only
                  analogue_gain 0x009e0903 (int)    : min=16 max=1023 step=1 default=32 value=32

Image Processing Controls

pixel_rate 0x009f0902 (int64) : min=81666700 max=81666700 step=1 default=81666700 value=81666700 flags=read-onlyUse v4l2-ctl for image capture:
Record video using gst-launch-1.0