¶ 产品介绍
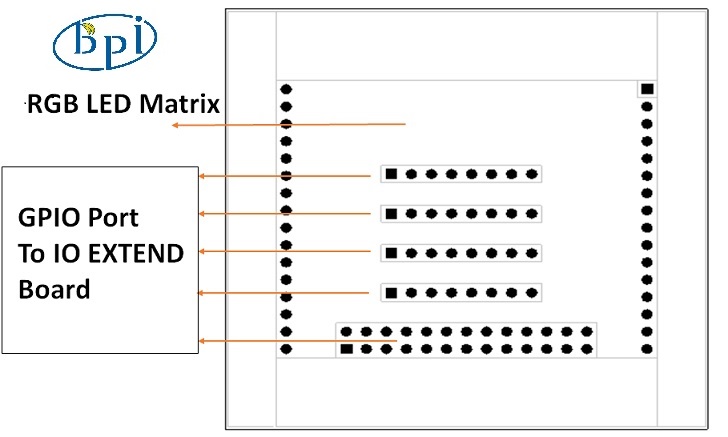
Matrix LED模块专为香蕉派设计。该模块具有8X8矩阵LED。用户可以通过编程自定义显示内容。注意,模块不包括驱动板。你必须配合无限级联IO扩展模块。
¶ 产品特点
-
全色RGB
-
方形LED点光源
-
超薄
-
即插即用
-
无需电线
¶ 端口
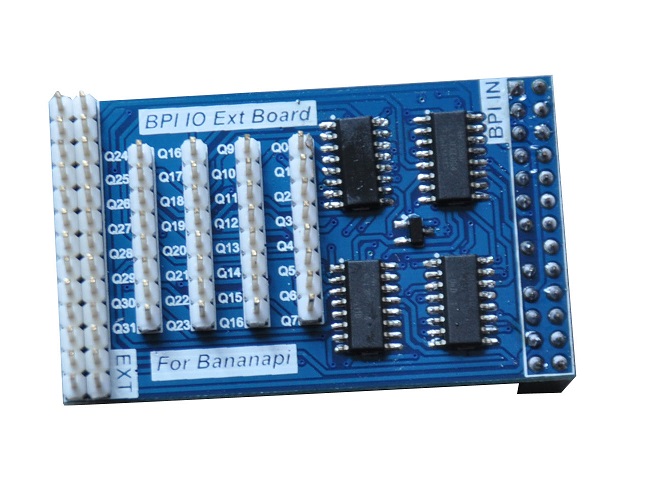
需要与IO扩展模块工作。
香蕉派连接端口,也可以用在树莓派上。
¶ 产品参数
-
点尺寸:5.0mm
-
像素阵列:8×8
-
发光强度:40mcd
-
包装尺寸:60mm×60mm
-
反向电压(最大):5V
-
正向电流(最大):25mA
-
峰值正向电流(最大):100mA
-
功耗(最大):100mW
-
工作温度(最高):-35~+85℃
-
储存温度(最高):-35~+85℃
-
铅焊料温度(最高):260℃,持续5秒
¶ 典型应用
-
滚动显示
-
电子显示器
-
动态标示
-
产品规格:**
-
¶ 如何使用
¶ 如何在BPI-M1上使用
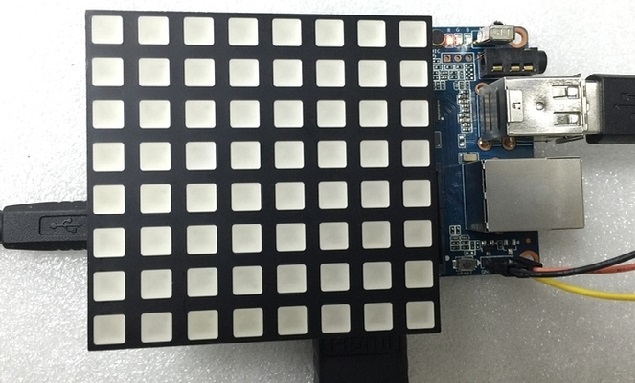
对于向日葵,只需插入这两个模块,如下图所示

¶ 如何在BPI-M3上使用
操作系统:Ubuntu 15.10(Kernel3.4)
版本:1.0 HDMI
步骤1:下载WiringPI
$ git clone https://github.com/BPI-SINOVOIP/BPI-WiringPi.git1 -b BPI_M3
$ cd BPI-WiringPi
$ chmod +x ./build
$ sudo ./build步骤2:将示例代码复制到Blue_RGB8*8.c文件中
$ sudo vi Blue_RGB8*8.c第三步:编译Blue_RGB8*8.c
$ gcc -o Blue_RGB8*8 Blue_RGB8*8.c -l wiringPi第四步:运行Blue_RGB8*8
$ sudo ./Blue_RGB8*8youtube Video Demo how to install hardware: https://www.youtube.com/watch?v=K6mRB_CtOlI&feature=youtu.be
youtube Video Demo for display : https://www.youtube.com/watch?v=ynxjzZiSGDo
¶ 示例代码:
#include <stdio.h>
#include <wiringPi.h>
#include <sr595.h>
#define SPACE { \
{0, 0, 0, 0, 0, 0, 0, 0}, \
{0, 0, 0, 0, 0, 0, 0, 0}, \
{0, 0, 0, 0, 0, 0, 0, 0}, \
{0, 0, 0, 0, 0, 0, 0, 0}, \
{0, 0, 0, 0, 0, 0, 0, 0}, \
{0, 0, 0, 0, 0, 0, 0, 0}, \
{0, 0, 0, 0, 0, 0, 0, 0}, \
{0, 0, 0, 0, 0, 0, 0, 0} \
}
#define FULL { \
{1, 1, 1, 1, 1, 1, 1, 1}, \
{1, 1, 1, 1, 1, 1, 1, 1}, \
{1, 1, 1, 1, 1, 1, 1, 1}, \
{1, 1, 1, 1, 1, 1, 1, 1}, \
{1, 1, 1, 1, 1, 1, 1, 1}, \
{1, 1, 1, 1, 1, 1, 1, 1}, \
{1, 1, 1, 1, 1, 1, 1, 1}, \
{1, 1, 1, 1, 1, 1, 1, 1} \
}
#define H { \
{0, 1, 0, 0, 0, 0, 1, 0}, \
{0, 1, 0, 0, 0, 0, 1, 0}, \
{0, 1, 0, 0, 0, 0, 1, 0}, \
{0, 1, 0, 0, 0, 0, 1, 0}, \
{0, 1, 1, 1, 1, 1, 1, 0}, \
{0, 1, 0, 0, 0, 0, 1, 0}, \
{0, 1, 0, 0, 0, 0, 1, 0}, \
{0, 1, 0, 0, 0, 0, 1, 0} \
}
#define E { \
{0, 1, 1, 1, 1, 1, 1, 0}, \
{0, 1, 0, 0, 0, 0, 0, 0}, \
{0, 1, 0, 0, 0, 0, 0, 0}, \
{0, 1, 1, 1, 1, 1, 1, 0}, \
{0, 1, 0, 0, 0, 0, 0, 0}, \
{0, 1, 0, 0, 0, 0, 0, 0}, \
{0, 1, 0, 0, 0, 0, 0, 0}, \
{0, 1, 1, 1, 1, 1, 1, 0} \
}
#define L { \
{0, 1, 0, 0, 0, 0, 0, 0}, \
{0, 1, 0, 0, 0, 0, 0, 0}, \
{0, 1, 0, 0, 0, 0, 0, 0}, \
{0, 1, 0, 0, 0, 0, 0, 0}, \
{0, 1, 0, 0, 0, 0, 0, 0}, \
{0, 1, 0, 0, 0, 0, 0, 0}, \
{0, 1, 0, 0, 0, 0, 0, 0}, \
{0, 1, 1, 1, 1, 1, 1, 0} \
}
#define O { \
{0, 0, 0, 1, 1, 0, 0, 0}, \
{0, 0, 1, 0, 0, 1, 0, 0}, \
{0, 1, 0, 0, 0, 0, 1, 0}, \
{0, 1, 0, 0, 0, 0, 1, 0}, \
{0, 1, 0, 0, 0, 0, 1, 0}, \
{0, 1, 0, 0, 0, 0, 1, 0}, \
{0, 0, 1, 0, 0, 1, 0, 0}, \
{0, 0, 0, 1, 1, 0, 0, 0} \
}
#define Smile { \
{0, 0, 1, 1, 1, 1, 0, 0}, \
{0, 1, 0, 0, 0, 0, 1, 0}, \
{1, 0, 1, 0, 0, 1, 0, 1}, \
{1, 0, 0, 0, 0, 0, 0, 1}, \
{1, 0, 1, 0, 0, 1, 0, 1}, \
{1, 0, 0, 1, 1, 0, 0, 1}, \
{0, 1, 0, 0, 0, 0, 1, 0}, \
{0, 0, 1, 1, 1, 1, 0, 0} \
}
#define Line { \
{1, 0, 0, 0, 0, 0, 0, 0}, \
{0, 1, 0, 0, 0, 0, 0, 0}, \
{0, 0, 1, 0, 0, 0, 0, 0}, \
{0, 0, 0, 1, 0, 0, 0, 0}, \
{0, 0, 0, 0, 1, 0, 0, 0}, \
{0, 0, 0, 0, 0, 1, 0, 0}, \
{0, 0, 0, 0, 0, 0, 1, 0}, \
{0, 0, 0, 0, 0, 0, 0, 1}, \
}
int RowRed[8]={116,117,118,119,120,121,122,123};
int RowGreen[8]={108,109,110,111,112,113,114,115};
int RowBlue[8]={100,101,102,103,104,105,106,107};
int Column[8]={124,125,126,127,128,129,130,131};

void MatrixSetup()
{
int j;
for(j = 0; j < 32; j++)
{
pinMode(100 + j, OUTPUT);
}
for(j = 0; j < 8; j++)
{
digitalWrite(100 + j, 1);
}
for(j = 0; j < 8; j++)
{
digitalWrite(116 + j, 1);
}
for(j = 0; j < 8; j++)
{
digitalWrite(108 + j, 1);
}
}
void Clear()
{
int i;
for(i=0;i<8;i++)
{
digitalWrite(RowRed[i],1);
digitalWrite(RowGreen[i],1);
digitalWrite(RowBlue[i],1);
digitalWrite(Column[i],0);
}
}
int main(int argc, char *argv[])
{
int column, row, thisPixel;
long long k;
wiringPiSetup();
sr595Setup(100, 32, 12, 14, 10);
MatrixSetup();
int matrix[8][8]= Smile ;
while(1)
{
Clear();
for(column=0;column<8;column++)
{
digitalWrite(Column[column],1);
for(row=0;row<8;row++)
{
if(matrix[column][row] == 1)
digitalWrite(RowBlue[row],0); // Blue color
digitalWrite(RowBlue[row],1); // Blue color
}
digitalWrite(Column[column],0);
}
}
}