
¶ Introduction
Banana Pi BPI-M6 is a new generation single board computer design, using Synaptics VS680 quad-core Cortex-A73 (2.1GHz) and One Cortex-M3 processor, Imagination GE9920 GPU.and NPU Up to 6 .75Tops. Onboard 4GB LPDDR4 memory and 16GB EMMC storage, and supports 4 USB 3.0 interface, a gigabit network port. Onboard 1 HDMI-rx port and 1 HDMI-TX port.
| More Infomation: Banana Pi BPI-M6 |
¶ Specifications
-
Synaptics VideoSmart VS680 quad-core Cortex-A73 (2.1GHz) and One Cortex-M3 processor
-
Imagination GE9920 GPU
-
NPU for AI up to 6 .75Tops
-
System Memory – 4GB LPDDR4
-
Storage – 16GB eMMC flash
-
Video Output – 1 HDMIin and 1 HDMIout
-
Connectivity – Gigabit Ethernet
-
USB – 4x USB 3.0 ports via VL817 hub controller, 1x USB-C port (for power only)
-
Expansion – 40-pin
-
Debugging – 3-pin debug header
-
Misc – Reset, Power, and U-boot button; power and activity LED’s
-
Power Supply – 5V @3A via USB Type-C port
-
M.2 Key E(PCIe + MIPI CSI)
¶ Development
¶ Prepare
-
Prepare a USB serial cable and a 5V/3A adaptor type-c power supply. The serial cable is used for console debugging and the type-c cable is used for Android image download.
-
Prepare an SDcard of at least 8GB for Linux development, Android only supports eMMC boot.
¶ Android
¶ Prepare
-
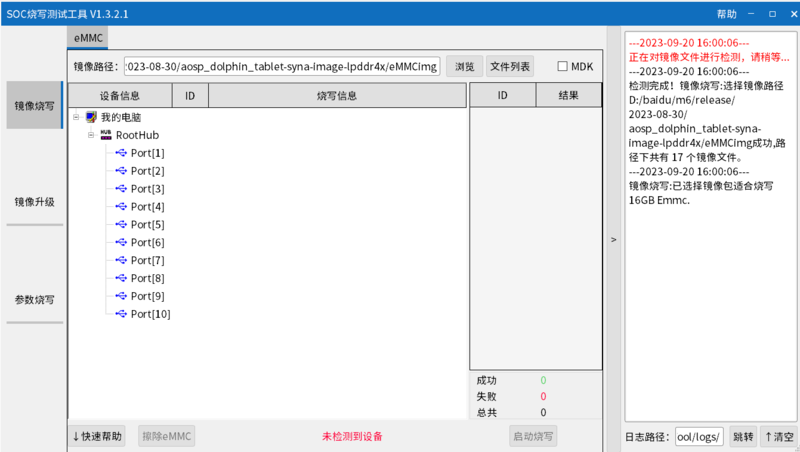
Download and install the SenarySocSystemTool for android image download via USB type-c on M6, only support windows.
-
Download the latest android image, and confirm that the md5 checksum is correct.
Download SenarySocSystemTool: Download Link
¶ Install Image with Usb Burning Tool
-
Open SenarySocSystemTool.exe, click Browse, and select the eMMCimg folder where the image is located.
-
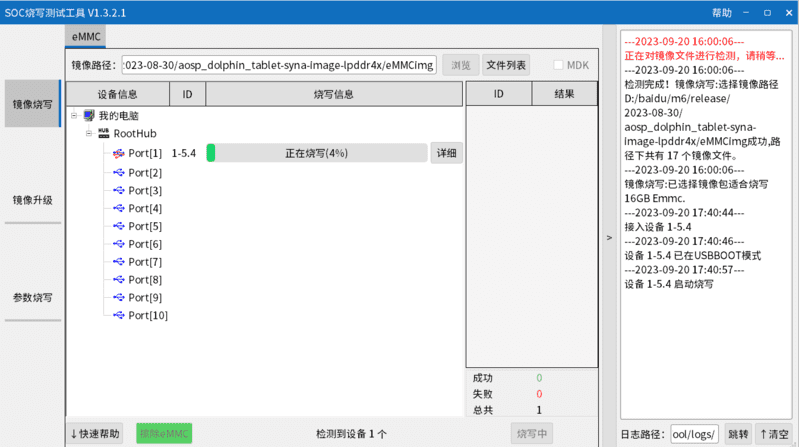
Press the USB button next to type-c and connect to the computer using the type-c cable.
-
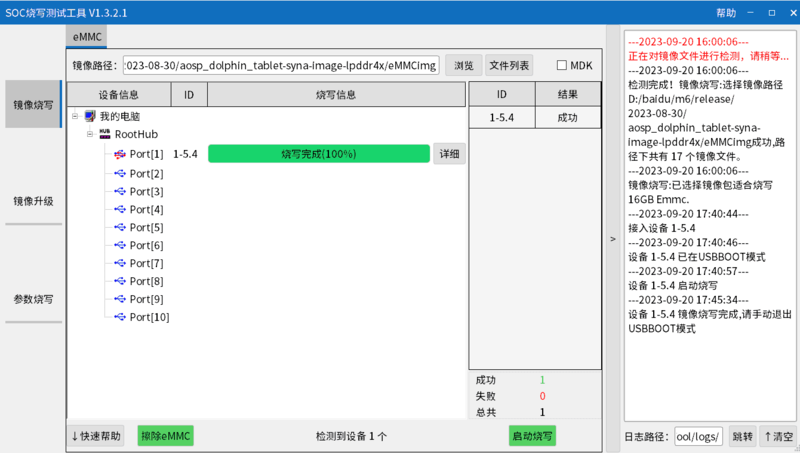
Click to start burning, and then wait for the burning to complete.
-
After Burning successfull, press the RST key, Unplug the usb and connect to power supply adaptor to startup.
-
If you want to erase eMMC, you can repeat the above steps, but you need to click on Erase eMMC instead of starting the burn.
¶ Linux
¶ Install Image to SD card
Install Image with Balena Etcher.
Balena Etcher is an opensource GUI flash tool by Balena, Flash OS images to SDcard or USB drive.
Click on "Flash from file" to select image.
Click on "Select target" to select USB device.
Click on "Flash!" Start burning.
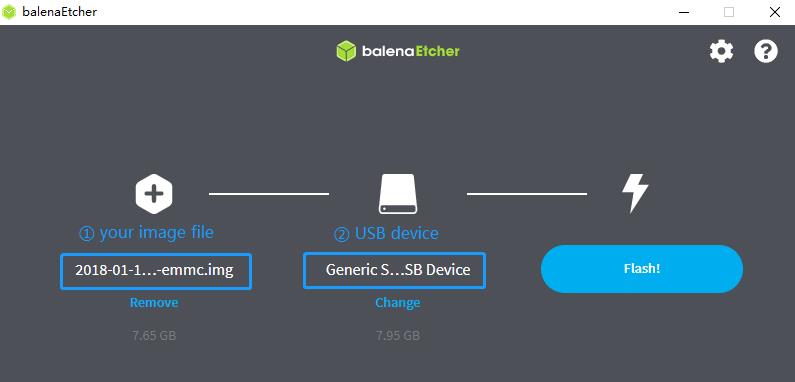
After the image is burned, insert the SD card into the BPI-M6. Press and hold the SPI key while inserting the power supply.
¶ Install Image to eMMC
| Before burning the image to emmc, it is recommended to erase the emc first. You can refer to here. |
-
First, prepare a bootable SD card and a new SPI file.
-
Open SenarySocSystemTool and switch to Spi Flash.
-
Change the path to the path where the spi file you downloaded is located.
-
Press the USB button next to type-c and connect to the computer using the type-c cable.Click to start burning.
-
Copy the image to a USB drive, insert it into the M6, then insert the SD card, and power on.
-
Mount the USB drive.
mount /dev/sda1 /mnt cd /mnt -
Then use the dd command to burn the image to emmc
dd if=Armbian-bpi-senarytech-trunk_Bananapim6-xxx.img of=/dev/mmcblk0 -
Wait for the burning to complete. Turn off the power, remove the SD card (if an SD card is inserted, the SD card will be started first), and then turn on the power while holding down the SPI key. Then the eMMC can be started.
¶ HDMI
VS680 HDMI TX functional properties:
-
Support hdmi v2.1
-
Support up to 2160p@60 YUV444
-
Support up to 1080p@60 with 12b deep color
-
Support up to HDCP 2.2
-
Support HBR output
-
Support HDR10 and HLG
¶ HDMI TX software configuration
VS680 currently uses two display frameworks, FB and DRM
Source code file for FB scheme:
syna-release/linux_5_4/drivers/video/syna/source/
Source code file for DBM scheme:
syna-release/linux_5_4/drivers/soc/berlin/modules/drm/
Enable the HDMI TX feature in the configuration file. The configuration file is located in the SDK’s syna-release/configs/product/vs680_a0_android_baseline_evk/vs680_a0_android_baseline_evk_defconfig,with the following configuration:
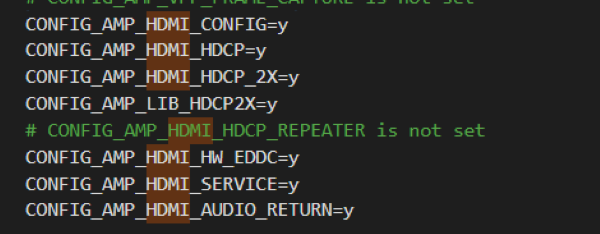
¶ Enable HDCP
test_disp enable/disable hdcp
test_disp setVersion 1 //set hdcp 1.4
test_disp setVersion 2 //set hdcp 2.2¶ Resolution Configuration
Supported standards: CEA-861-E video format
Supported resolutions:
3840x2160p60Hz/30Hz//24Hz
1920x1200@60hz
1920x1080p@60
1280x700p@60
Configure resolution and format on the command line:
test_disp setformat[Display ID] [Resolution ID] [BitDepth] [Color fmt] [Aspect Ratio][tgID][vout_mode]
Examples:
test_disp setformat 0 64 2 0¶ GPIO
¶ PWM
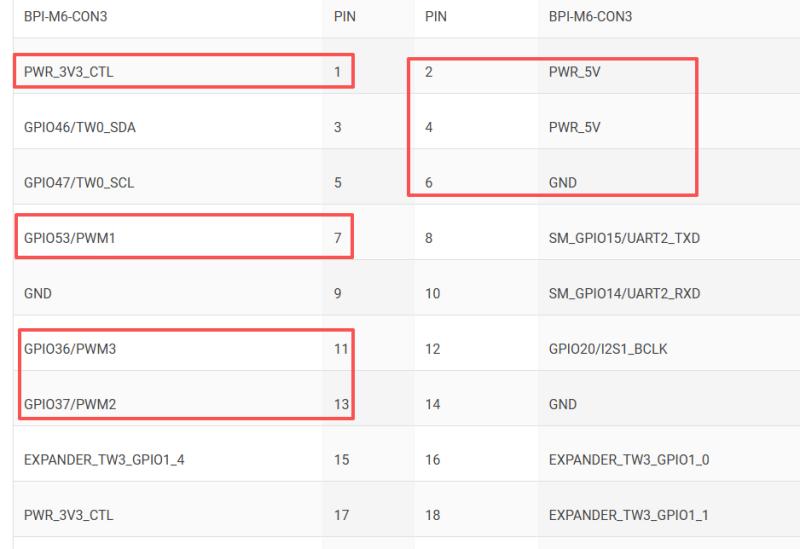
The BPI-M6 has three PWM pins, and their corresponding GPIOs are GPIO53, GPIO36 and GPIO37.
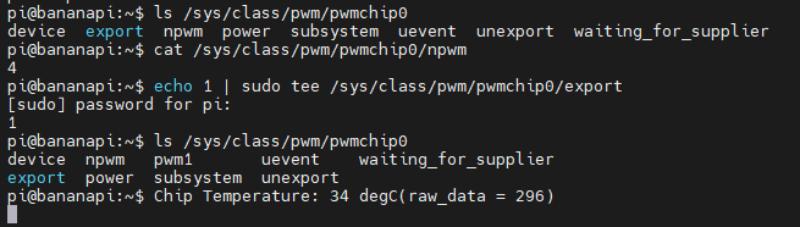
You can use the following command to enable it.
echo 1 |sudo tee /sys/class/pwm/pwmchip0/exportThen you can use this command to check if the pwm is enabled.
ls /sys/class/pwm/pwmchip0For example:
¶ Ethernet
¶ WiFi & BT
There are two ways to use WiFi & BT.
-
Purchase BPI-M6 CSI · WiFi accessories. Insert it into the M.2 Key E interface, and then insert a network card on the accessories.
-
WiFi&BT accessories using USB interface.
¶ Camera
You can purchase BPI-M6 CSI · WiFi accessories.There are two CSI interfaces above.