¶ Introduction
The BPI-M8 is built on the high-performance octa-core AI platform chip A733, which combines a dual-core Arm® Cortex®-A76 and a hexa-core Arm Cortex-A55. It supports an Imagination PowerVR BXM-4-64 MC1 GPU, a 3TOPS NPU, and LPDDR4, LPDDR4x, LPDDR5 DRAM and UFS/eMMC memory.
The BPI-M8 boasts a rich array of peripherals, including USB, DP, UFS, HDMI, MIPI CSI, MIPI DSI, FAN, RTC, and one Gigabit Ethernet port (supporting PoE). It also supports SD card booting and features an onboard KEIIOT K038 WiFi/Bluetooth chip. It is equipped with 4GB of LPDDR5 RAM, 32GB of eMMC storage, and two 12x12mm single-antenna modules. content
| More Infomation: Banana Pi BPI-M8 |
¶ Development
¶ Andriod
¶ Linux
¶ Install Image to SDcard
Windows PC
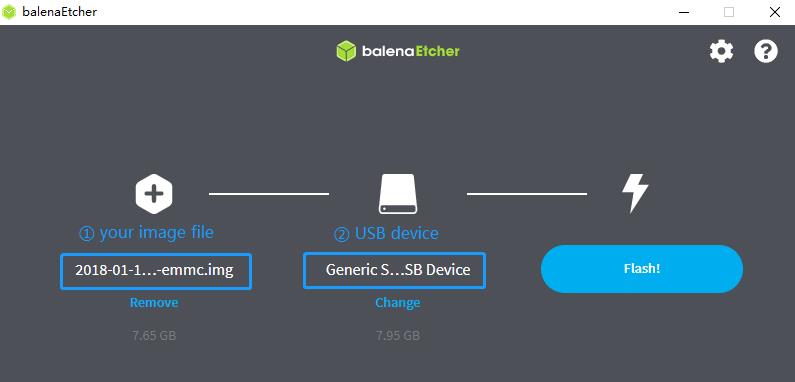
Install Image with Balena Etcher.
Balena Etcher is an opensource GUI flash tool by Balena, Flash OS images to SDcard or USB drive.
-
Click on "Flash from file" to select image.
-
Click on "Select target" to select USB device.
-
Click on "Flash!" Start burning.
Linux PC
There are two methods for you to choose from.
-
Install Image with dd command on Linux, umount SDcard device /dev/sdX partition if mounted automatically. Actually bpi-copy is the same as this dd command.
$ sudo apt-get install pv unzip $ sudo unzip -p xxx-bpi-m2-ultra-xxx.img.zip | pv | dd of=/dev/sdX bs=10M status=noxfer -
Install image with bpi-tools on Linux, plug SDcard to Linux PC and run
 $ sudo apt-get install pv unzip
 $ sudo bpi-copy xxx-bpi-m2-ultra-xxx.img.zip /dev/sdX
¶ Install Image to EMMC
-
Insert the SD card into the M8 and boot it up.
-
Store the image to be burned into a USB memory and connect the USB device to the M8.
-
Use the lsblk command to query USB devices.
root@bananapim8:~# lsblk NAME MAJ:MIN RM SIZE RO TYPE MOUNTPOINTS sda 8:0 1 0B 0 disk sdb 8:16 1 0B 0 disk mmcblk1 179:0 0 29.1G 0 disk mmcblk0 179:8 0 7.4G 0 disk ├─mmcblk0p1 179:9 0 256M 0 part /boot └─mmcblk0p2 179:10 0 7G 0 part /var/log.hdd / zram0 254:0 0 1.9G 0 disk [SWAP] zram1 254:1 0 50M 0 disk /var/log zram2 254:2 0 0B 0 disk -
Use the mount command to mount the USB drive and navigate to the directory where the image is stored.
root@bananapim8:/mnt/M8# lsblk NAME MAJ:MIN RM SIZE RO TYPE MOUNTPOINTS sda 8:0 1 0B 0 disk sdb 8:16 1 0B 0 disk sdc 8:32 1 59.5G 0 disk └─sdc1 8:33 1 59.5G 0 part /mnt sdd 8:48 1 0B 0 disk mmcblk1 179:0 0 29.1G 0 disk mmcblk0 179:8 0 7.4G 0 disk ├─mmcblk0p1 179:9 0 256M 0 part /boot └─mmcblk0p2 179:10 0 7G 0 part /var/log.hdd / zram0 254:0 0 1.9G 0 disk [SWAP] zram1 254:1 0 50M 0 disk /var/log zram2 254:2 0 0B 0 disk root@bananapim8:/mnt/M8# ls Bananapi-Armbian_26.05.0-trunk_Bananapim8_bookworm_legacy_5.15.147_xfce_desktop.img -
Use the dd command to burn the image.
root@bananapim8:/mnt/M8# ls Bananapi-Armbian_26.05.0-trunk_Bananapim8_bookworm_legacy_5.15.147_xfce_desktop.img root@bananapim8:/mnt/M8# dd if=Bananapi-Armbian_26.05.0-trunk_Bananapim8_bookworm_legacy_5.15.147_xfce_desktop.img of=/dev/mmcblk1 输入了 10723328+0 块记录 输出了 10723328+0 块记录 5490343936 字节 (5.5 GB, 5.1 GiB) 已复制,240.847 s,22.8 MB/s -
Remove the SD card and power on the M8 again to boot using eMMC.
¶ Other Development
¶ USB
Connect the USB device you want to use to the M8.
root@bananapim8:~# lsblk
NAME        MAJ:MIN RM  SIZE RO TYPE MOUNTPOINTS
sda           8:0    1    0B  0 disk
sdb           8:16   1    0B  0 disk
sdc           8:32   1 59.5G  0 disk
└─sdc1        8:33   1 59.5G  0 part
sdd           8:48   1    0B  0 disk
mmcblk1     179:0    0 29.1G  0 disk
mmcblk0     179:8    0  7.4G  0 disk
├─mmcblk0p1 179:9    0  256M  0 part /boot
└─mmcblk0p2 179:10   0    7G  0 part /var/log.hdd
                                     /
zram0       254:0    0  1.9G  0 disk [SWAP]
zram1       254:1    0   50M  0 disk /var/log
zram2       254:2    0    0B  0 disk
root@bananapim8:~# lsusb
Bus 004 Device 001: ID 1d6b:0001 Linux Foundation 1.1 root hub
Bus 003 Device 001: ID 1d6b:0002 Linux Foundation 2.0 root hub
Bus 002 Device 001: ID 1d6b:0003 Linux Foundation 3.0 root hub
Bus 001 Device 003: ID 0bda:0301 Realtek Semiconductor Corp. multicard reader
Bus 001 Device 002: ID 1a86:8091 QinHeng Electronics USB HUB
Bus 001 Device 001: ID 1d6b:0002 Linux Foundation 2.0 root hub¶ network
Connect the network cable to the network port.
root@bananapim8:~# ip a
1: lo: <LOOPBACK,UP,LOWER_UP> mtu 65536 qdisc noqueue state UNKNOWN group default qlen 1000
    link/loopback 00:00:00:00:00:00 brd 00:00:00:00:00:00
    inet 127.0.0.1/8 scope host lo
       valid_lft forever preferred_lft forever
    inet6 ::1/128 scope host noprefixroute
       valid_lft forever preferred_lft forever
2: ip_vti0@NONE: <NOARP> mtu 1480 qdisc noop state DOWN group default qlen 1000
    link/ipip 0.0.0.0 brd 0.0.0.0
3: ip6_vti0@NONE: <NOARP> mtu 1364 qdisc noop state DOWN group default qlen 1000
    link/tunnel6 :: brd :: permaddr 96a4:9905:4718::
4: sit0@NONE: <NOARP> mtu 1480 qdisc noop state DOWN group default qlen 1000
    link/sit 0.0.0.0 brd 0.0.0.0
5: ip6tnl0@NONE: <NOARP> mtu 1452 qdisc noop state DOWN group default qlen 1000
    link/tunnel6 :: brd :: permaddr c660:9fcf:33dc::
6: end0: <BROADCAST,MULTICAST,UP,LOWER_UP> mtu 1500 qdisc mq state UP group default qlen 1000
    link/ether d0:96:16:de:fa:97 brd ff:ff:ff:ff:ff:ff
    inet 10.168.1.199/24 brd 10.168.1.255 scope global dynamic noprefixroute end0
       valid_lft 43022sec preferred_lft 43022sec
    inet6 fd0b:9aaf:b1a:0:5525:fc96:c1bb:9b64/64 scope global noprefixroute
       valid_lft forever preferred_lft forever
    inet6 fe80::289c:25a6:4957:e0d9/64 scope link noprefixroute
       valid_lft forever preferred_lft forever
root@bananapim8:~# ping baidu.com
PING baidu.com (124.237.177.164) 56(84) bytes of data.
64 bytes from 124.237.177.164 (124.237.177.164): icmp_seq=1 ttl=52 time=35.0 ms
64 bytes from 124.237.177.164 (124.237.177.164): icmp_seq=2 ttl=52 time=34.6 ms
64 bytes from 124.237.177.164 (124.237.177.164): icmp_seq=3 ttl=52 time=34.6 ms
^C64 bytes from 124.237.177.164: icmp_seq=4 ttl=52 time=34.4 ms

--- baidu.com ping statistics ---
4 packets transmitted, 4 received, 0% packet loss, time 15651ms
rtt min/avg/max/mdev = 34.434/34.657/34.988/0.203 msThe network port speed, tested with the iperf3 tool, is normally around 1Gbps.
[ ID] Interval           Transfer     Bitrate
[  5]   0.00-1.00   sec   111 MBytes   928 Mbits/sec
[  5]   1.00-2.00   sec   110 MBytes   921 Mbits/sec
[  5]   2.00-3.00   sec   111 MBytes   933 Mbits/sec
[  5]   3.00-4.00   sec   112 MBytes   938 Mbits/sec
[  5]   4.00-5.00   sec   112 MBytes   938 Mbits/sec
[  5]   5.00-6.00   sec   112 MBytes   938 Mbits/sec
[  5]   6.00-7.00   sec   112 MBytes   938 Mbits/sec
[  5]   7.00-8.00   sec   112 MBytes   938 Mbits/sec
[  5]   8.00-9.00   sec   112 MBytes   936 Mbits/sec
[  5]   9.00-10.00  sec   112 MBytes   938 Mbits/sec
- - - - - - - - - - - - - - - - - - - - - - - - -
[ ID] Interval           Transfer     Bitrate
[  5]   0.00-10.00  sec  1.09 GBytes   934 Mbits/sec                  sender
[  5]   0.00-10.00  sec  1.09 GBytes   934 Mbits/sec                  receiver

iperf Done.¶ WiFi
Use the nmcli command to connect to WiFi.
sudo nmcli dev wifi connect "<SSID>" password "<password>" //connect WiFi
sudo nmcli connection down "SSID" //disconnect WiFiThen you can use WiFi.
root@bananapim8:~# ip a
1: lo: <LOOPBACK,UP,LOWER_UP> mtu 65536 qdisc noqueue state UNKNOWN group default qlen 1000
    link/loopback 00:00:00:00:00:00 brd 00:00:00:00:00:00
    inet 127.0.0.1/8 scope host lo
       valid_lft forever preferred_lft forever
    inet6 ::1/128 scope host noprefixroute
       valid_lft forever preferred_lft forever
2: ip_vti0@NONE: <NOARP> mtu 1480 qdisc noop state DOWN group default qlen 1000
    link/ipip 0.0.0.0 brd 0.0.0.0
3: ip6_vti0@NONE: <NOARP> mtu 1364 qdisc noop state DOWN group default qlen 1000
    link/tunnel6 :: brd :: permaddr b621:40ef:3118::
4: sit0@NONE: <NOARP> mtu 1480 qdisc noop state DOWN group default qlen 1000
    link/sit 0.0.0.0 brd 0.0.0.0
5: ip6tnl0@NONE: <NOARP> mtu 1452 qdisc noop state DOWN group default qlen 1000
    link/tunnel6 :: brd :: permaddr 2af0:cf62:c68a::
6: wlan0: <NO-CARRIER,BROADCAST,MULTICAST,UP> mtu 1500 qdisc mq state DOWN group default qlen 1000
    link/ether 88:49:2d:60:20:3e brd ff:ff:ff:ff:ff:ff
7: p2p0: <BROADCAST,MULTICAST,UP,LOWER_UP> mtu 1500 qdisc mq state UP group default qlen 1000
    link/ether 8a:49:2d:60:20:3e brd ff:ff:ff:ff:ff:ff
    inet 10.168.1.160/24 brd 10.168.1.255 scope global dynamic noprefixroute p2p0
       valid_lft 43193sec preferred_lft 43193sec
    inet6 fe80::e2d8:3f6a:f09d:f52b/64 scope link noprefixroute
       valid_lft forever preferred_lft forever
8: wlan1: <NO-CARRIER,BROADCAST,MULTICAST,UP> mtu 1500 qdisc mq state DOWN group default qlen 1000
    link/ether 82:49:2d:60:20:3e brd ff:ff:ff:ff:ff:ff
9: end0: <NO-CARRIER,BROADCAST,MULTICAST,UP> mtu 1500 qdisc mq state DOWN group default qlen 1000
    link/ether b4:7a:5c:89:ac:59 brd ff:ff:ff:ff:ff:ff
root@bananapim8:~# ping baidu.com
PING baidu.com (124.237.177.164) 56(84) bytes of data.
64 bytes from 124.237.177.164 (124.237.177.164): icmp_seq=1 ttl=52 time=146 ms
64 bytes from 124.237.177.164 (124.237.177.164): icmp_seq=2 ttl=52 time=98.4 ms
64 bytes from 124.237.177.164 (124.237.177.164): icmp_seq=3 ttl=52 time=97.8 ms
^C64 bytes from 124.237.177.164: icmp_seq=4 ttl=52 time=99.5 ms¶ HDMI out
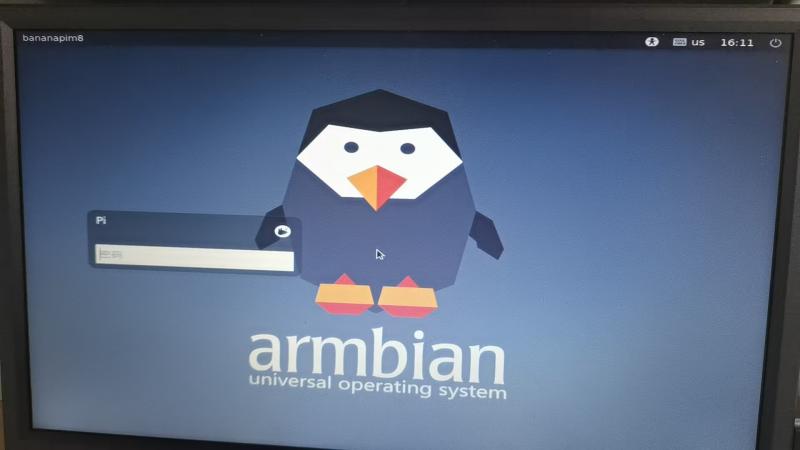
Connect to the display via HDMI cable.
¶ Button
¶ PWR
Power off by short pressing the PWR button.
The following log will appear when shutting down:
root@bananapim8:~#
[ 2010.090118][    T1] npu[1][1] unregister cooling
[ 2010.095369][    T1] npu[1][1] remove opp freq: 492000000
[ 2010.101349][    T1] npu[1][1] remove opp freq: 852000000
[ 2010.107323][    T1] npu[1][1] remove opp freq: 1008000000
[ 2010.113401][    T1] sunxi:vin:[WARN]: video0 device have been closed!
[ 2010.193946][ T1] reboot: Power downPower on by long pressing the PWR button.
¶ Audio
Using aplay commands, you can find that the M8’s sound card has two outputs:
-
HP headphone output
-
HDMI output
root@bananapim8:~# aplay -l
**** List of PLAYBACK Hardware Devices ****
card 0: sndi2s0 [sndi2s0], device 0: sunxi-snd-plat-i2s-ac101-codec sunxi-ac101.15-001a-0 []
  Subdevices: 0/1
  Subdevice #0: subdevice #0
card 1: allwinnerhdmi [allwinner-hdmi], device 0: sunxi-snd-plat-i2s-sunxi-snd-codec-hdmi soc@3000000:hdmi_codec- []
  Subdevices: 1/1
Subdevice #0: subdevice #0¶ RTC
Connect batteries with a 2mm spacing to power the RTC.
View system RTC configuration
root@bananapim8:~# dmesg | grep -Ei "rtc|sunxi-rtc"
[    0.054099] sunxi:ccu-ng:[INFO]: sunxi rtc-ccu version: 0.5.5
[    0.065807] sunxi:ccu-ng:[INFO]: rtc_ccu: sunxi ccu init OK
[    0.201736] axp8191-rtcldo: supplied by regulator-dummy
[    2.838689] sunxi-rtc 7090000.rtc: errata__fix_alarm_day_reg_default_value(): ALARM0_DAY_REG=0, set it to 1
[    2.850795] sunxi-rtc 7090000.rtc: registered as rtc0
[    2.857255] sunxi-rtc 7090000.rtc: sunxi rtc probed
[    5.509982] [drm] sunxi_de_bind crtc init for de 0 ok
[    5.517001] [drm] sunxi_de_bind crtc init for de 1 ok
[ 21.530070] [drm] [SUNXI-CRTC]sunxi_crtc_atomic_enableSet RTC time
root@bananapim8:~# date -s "2026-08-20 16:30:00" //Set system time
2026年 08月 20日 星期四 16:30:00 CST
root@bananapim8:~# hwclock -w -f /dev/rtc0 //RTC writing time
root@bananapim8:~# hwclock -r -f /dev/rtc0 //RTC reading time
2026-08-20 16:30:28.460504+08:00
root@bananapim8:~# date  //Query system time
2026年 08月 20日 星期四 16:30:42 CST
root@bananapim8:~# hwclock -r -f /dev/rtc0
2026-08-20 16:30:52.447590+08:00Power off to verify if RTC is working
root@bananapim8:~# date -s "2026-08-20 16:30:00" //Set system time
2026年 08月 20日 星期四 16:30:00 CST
root@bananapim8:~# hwclock -w -f /dev/rtc0 //RTC writing time
root@bananapim8:~# hwclock -r -f /dev/rtc0 //RTC reading time
2026-08-20 16:30:28.460504+08:00
root@bananapim8:~# date  //Query system time
2026年 08月 20日 星期四 16:30:42 CST
root@bananapim8:~# hwclock -r -f /dev/rtc0
2026-08-20 16:30:52.447590+08:00A few minutes after a power outage, the RTC clock is still active, but the system clock has been stopped for several minutes.
root@bananapim8:~# date
2026年 08月 20日 星期四 16:41:54 CST
root@bananapim8:~# hwclock -r -f /dev/rtc0
2026-08-20 16:43:04.558201+08:00¶ FAN
Query system fan control PWM device
root@bananapim8:~# cat /sys/class/hwmon/hwmon0/name
pwmfan
root@bananapim8:~# ls /sys/class/hwmon/
hwmon0Use commands to control the fan switch
root@bananapim8:~# echo 1 > /sys/class/hwmon/hwmon0/pwm1
root@bananapim8:~# echo 0 > /sys/class/hwmon/hwmon0/pwm1