¶ Introduction
Banana Pi M2M is another ARM SoC powered development board that offers great computing performance in an ultra portable form factor. It is a 51mm square with Allwinner A33 Quad-core A7 SoC and 512MB DDR3 RAM.
| More Infomation: Banana Pi BPI-M2_Magic |
¶ specifications
-
Quad Core ARM Cortex A7 CPU. R16
-
512MB DDR3 SDRAM
-
WiFi (AP6212) & Bluetooth onboard
¶ Development
¶ Prepare
-
One BPI-M2 Magic, one minimum 8G SD card, TTL cable, power adapter.
-
Download the image and verify if MD5 is correct.
¶ Android
¶ Prepare
-
Download PhoenixCard: https://pan.baidu.com/s/1-fjvPqtG_zewVzqnXf1AHw?pwd=eid9
¶ Install Image with SD card
-
Put your TF card into a TF-USB adapter, and then plug adapter in your Windows PC usb interface.
-
Prepare your image, and download image burning tools PhoenixCard.exe.
-
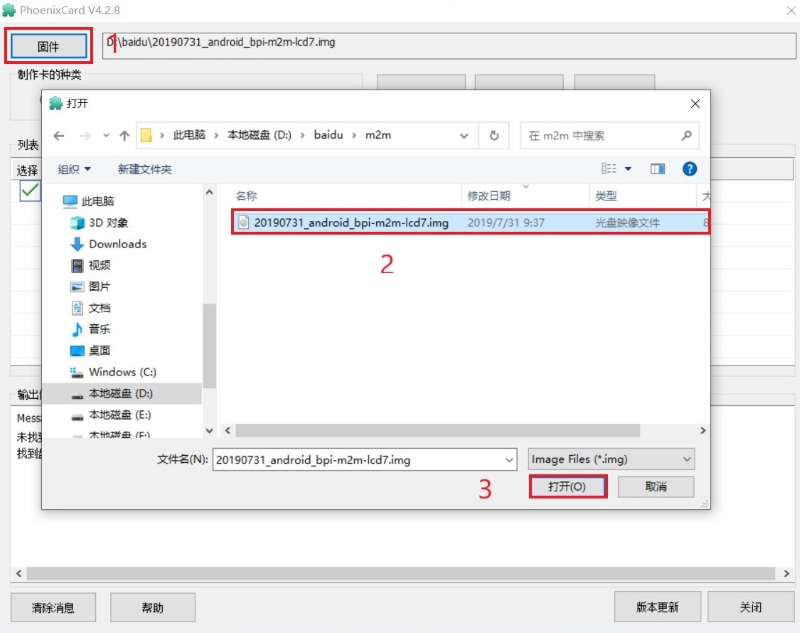
Use "PhoenixCard.exe" to burn android image to TF card.
-
Select the image in the image path option

-
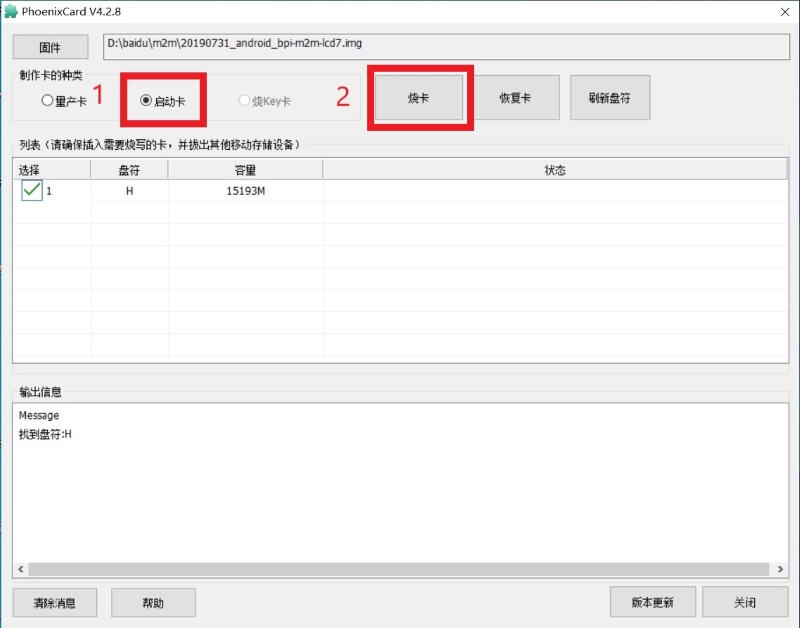
Select set as card startup, then click on burn image
-
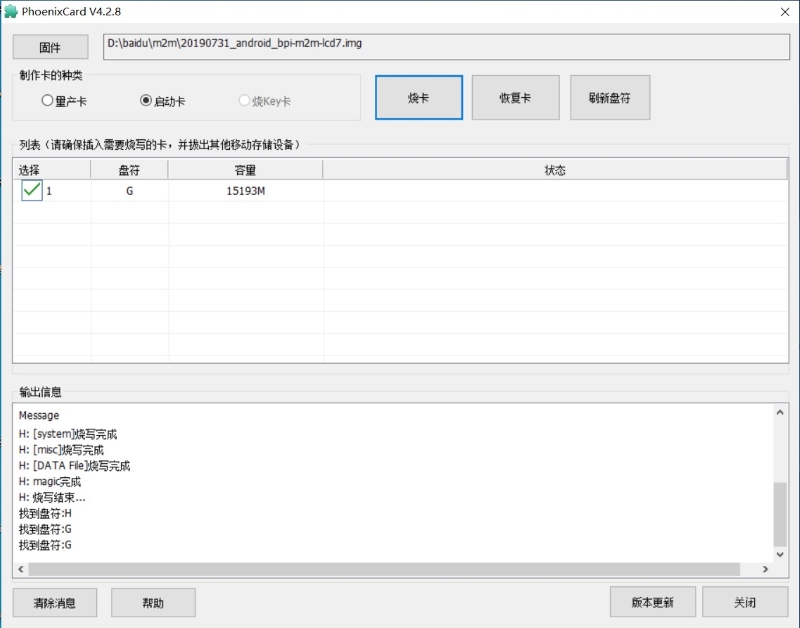
Burning ended
-
¶ Linux
¶ Prepare
-
Prepare 8G/above TF card, USB-Serial cable.
-
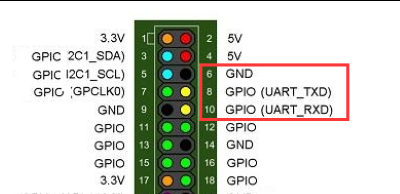
Connect USB-Serial to 40 pin header uart2 for kernel console debug.
Note: three pin header uart0 beside usb port is not debug uart for bpi release images because SDcard and uart0 are multiplex pin and default bpi images support both SD and eMMC. If you want bootup with emmc only and enable uart0 as debug port without SDcard support, please refer to enable uart0 debug for emmc only image section. 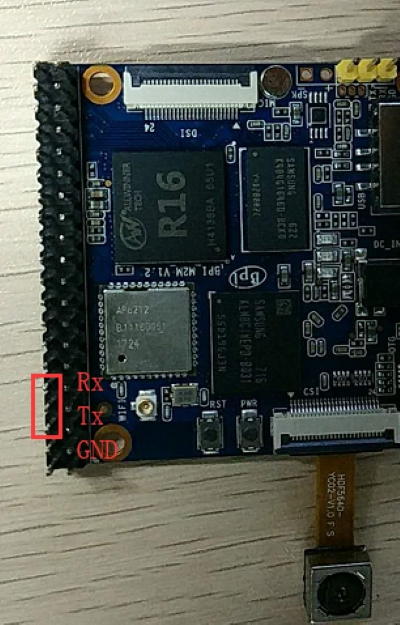
-
Install bpi-tools on your Linux PC, If you can’t access this URL or any other problems, please go to bpi-tools repo and download this tools manually.
$ apt-get install pv $ curl -sL https://github.com/BPI-SINOVOIP/bpi-tools/raw/master/bpi-tools | sudo -E bash -
Download latest linux image, and confirm that the md5 checksum is correct.
-
Defautl login: pi/bananapi or root/bananapi.
¶ Install Image with SD card
Windows
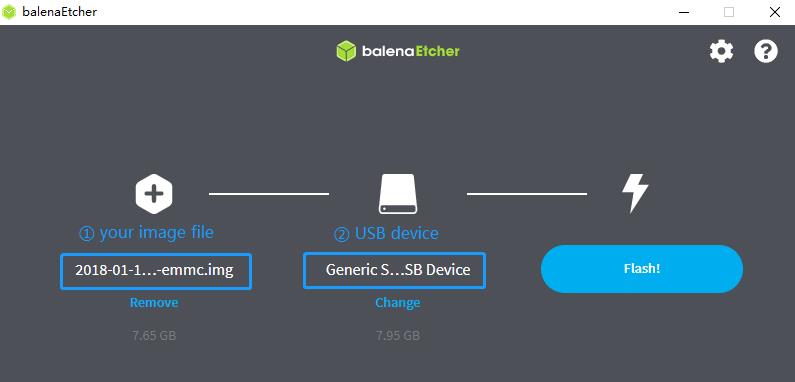
Install Image with Balena Etcher.
Balena Etcher is an opensource GUI flash tool by Balena, Flash OS images to SDcard or USB drive.
-
Click on "Flash from file" to select image.
-
Click on "Select target" to select USB device.
-
Click on "Flash!" Start burning.
Linxu
There are two methods for you to choose from.
-
Install image with bpi-tools on Linux, plug your sd card to your Linux PC
$ sudo bpi-copy xxx-bpi-m2m-xxx.img.zip /dev/sdX -
Install image with dd command on Linux, umount SDcard device /dev/sdX partitions if mounted automatically, Actually bpi-copy is the same as this dd command.
$ sudo apt-get install pv
$ sudo unzip -p xxx-bpi-m2m-xxx.img.zip | pv | dd of=/dev/sdX bs=10M status=noxfer
¶ Install Image with eMMC
-
Prepare a SDcard with Linux image flashed and bootup the board with this SDcard.
-
Copy emmc image to udisk, plugin the udisk to board and mount it.
-
Install with bpi-tools command
$ sudo bpi-copy xxx-bpi-m2m-xxx.img.zip /dev/mmcblk1 -
Or Install with dd command, umount mmcblk1p1 and mmcblk1p2 partition if mounted automatically, Actually bpi-copy is the same as this dd command
$ sudo apt-get install pv $ sudo unzip -p xxxb-bpi-m2m-xxx.img.zip | pv | dd of=/dev/mmcblk1 bs=10M status=noxfer -
After flash complete, power off safely and eject the sdcard.
| Note: If the emmc was flashed android image before, you must erase the boot partition of android before step 3 or step 4. |
   root@bpi-iot-ros-ai:/# echo 0 > /sys/block/mmcblk1/mmcblk1boot0/force_ro
   root@bpi-iot-ros-ai:/# echo 0 > /sys/block/mmcblk1/mmcblk1boot1/force_ro
   root@bpi-iot-ros-ai:/#
   root@bpi-iot-ros-ai:/# dd if=/dev/zero of=/dev/mmcblk1boot0 bs=4096 count=1024
   1024+0 records in
   1024+0 records out
   4194304 bytes (4.2 MB, 4.0 MiB) copied, 0.421164 s, 10.0 MB/s
   root@bpi-iot-ros-ai:/# dd if=/dev/zero of=/dev/mmcblk1boot1 bs=4096 count=1024
   1024+0 records in
   1024+0 records out
4194304 bytes (4.2 MB, 4.0 MiB) copied, 0.428427 s, 9.8 MB/s¶ Advance Development
¶ Enable uart0 for emmc only image debug
-
Enable uart0 node and disable sdc0 node in sunxi-pack/sun8iw5p1/configs/BPI-M2M-LCD7/sys_config.fex.
--- a/sunxi-pack/sun8iw5p1/configs/BPI-M2M-LCD7/sys_config.fex +++ b/sunxi-pack/sun8iw5p1/configs/BPI-M2M-LCD7/sys_config.fex @@ -262,7 +262,7 @@ twi_sda = port:PE13<3><default><default><default> ;uart_type = 2:2 wire,4:4 wire,8:8 wire, full function ;---------------------------------------------------------------------------------- [uart0] -uart_used = 0 +uart_used = 1 uart_port = 0 uart_type = 2 uart_tx = port:PF02<3><1><default><default> @@ -803,7 +803,7 @@ led3_active_low = 1 ; that supports SD3.0 cards and eMMC4.4+ flashes ;------------------------------------------------------------------------------- [mmc0_para] -sdc_used = 1 +sdc_used = 0 sdc_detmode = 3 sdc_buswidth = 4 sdc_d1 = port:PF00<2><1><2><default> -
Build the bsp source code.
-
Copy the bootloader file SD/bpi-m2m/100MB/BPI-M2M-LCD7-8k.img.gz to udisk. bpi also provide a prebuild bootloader for this requirement.
-
Bootup the m2m board from emmc, plugin the udisk and mount it.
-
Flash the bootloader to emmc
$ sudo bpi-bootsel BPI-M2M-LCD7-8k.img.gz /dev/mmcblk0or
$ sudo gunzip -c BPI-M2M-LCD7-8k.img.gz | dd of=/dev/mmcblk0 bs=1024 seek=8 $ sync $ sudo umount /dev/sda1 -
Mout boot partition and set kernel debug console in uEnv.txt
$ sudo mount -t vfat /dev/mmcblk0p1 /mntChange "console=ttyS2,115200" to "console=ttyS0,115200" in /mnt/bananapi/bpi-m2m/linux/lcd7/uEnv.txt
$ sudo umount /dev/mmcblk0p1 -
Safely poweroff the board and connect debug uart to uart0 three pin header.
¶ Audio Path
-
2-pin HP header output audio path
2-pin HP header output audio path Number id
Ctl_name
value
1
headphone volume
0-63
104
AIF1IN0L Mux
AIF1_DA0L
103
AIF1IN0R Mux
AIF1_DA0R
100
DACL Mixer AIF1DA0L Switch
1
96
DACR Mixer AIF1DA0R Switch
1
78
HP_R Mux
DACR HPR Switch
77
HP_L Mux
DACL HPL Switch
105
Headphone Switch
1
-
Mic 1 input audio path
Mic 1 input audio path Number id
Ctl_name
value
56
AIF1OUT0L Mux
AIF1_AD0L
55
AIF1OUT0R Mux
AIF1_AD0R
51
AIF1 AD0L Mixer ADCL Switch
1
47
AIF1 AD0R Mixer ADCR Switch
1
24
ADCR Mux
ADC
25
ADCL Mux
ADC
34
LEFT ADC input Mixer MIC1 boost Switch
1
27
RIGHT ADC input Mixer MIC1 boost Switch
1
4
MIC1 boost amplifier gain
0-7
-
Alsa configuration file /var/lib/alsa/alsa.state.bpi-m2m already enable 2-pin HP output and Mic 1 input audio path, and restore by /var/lib/bananapi/bpi-autorun.d/S10-audio-bpi-m2m.sh after system bootup.
¶ Bluetooth
-
Use bluetoothctl tool to operate BT
-
Execute "bluetoothctl"
-
If you don’t know how to use bluetoothctl, type "help", you will see more commands
-
Execute these commands:
devices
power on
pairable on
discoverable on
agen on
list
scan on
connect to *****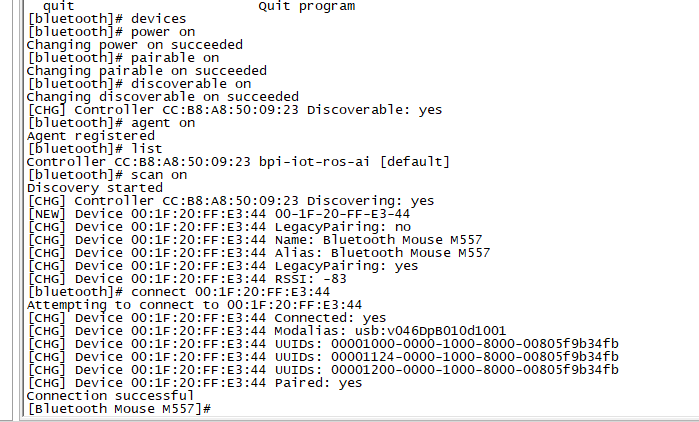
¶ WiFi Client
You have two ways to setup WiFi Client
-
Use commands to setup WiFi client
$ sudo su # killall wpa_supplicant # wpa_passphrase <ssid> <passphrase> > /etc/wpa_supplicant/wpa_supplicant.conf # ifconfig wlan0 up # iwlist wlan0 scan # wpa_supplicant -B -iwlan0 -c/etc/wpa_supplicant/wpa_supplicant.conf # dhclient wlan0There are some other command line ways, please google for them.
-
Use UI interface to setup WiFi Client
¶ Camara function
We use HDF5640 camara.
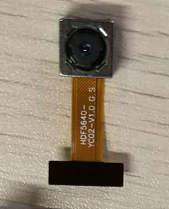
Guvcview
-
Use your UI interface to operate camara
-
Applications → Sound & Video → guvcview
Shell
We also have built-in command in /usr/local/bin to test camara
-
Test picture taking function
./test_ov5640_image_mode.sh -
Test video recording function
./cameratest.sh
¶ RPi.GPIO
Install RPi.GPIO
git clone https://github.com/BPI-SINOVOIP/RPi.GPIO"
cd RPi.GPIO
sudo apt-get update
sudo apt-get install python-dev python3-devInstall the module
sudo python setup.py installor
sudo python3 setup.py installUsing RPi.GPIO
cd /usr/local/bin
./bpi_test_g40.py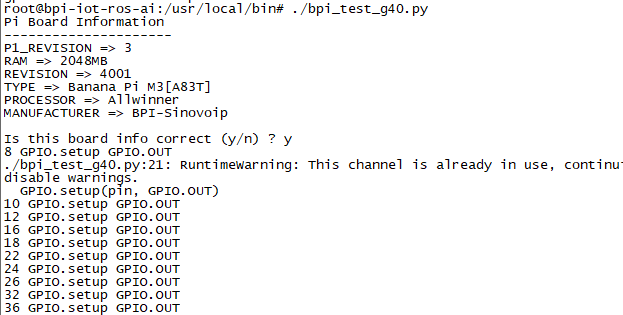
¶ WiringPi
-
We also have built-in test command in
/usr/local/bin
How to Update WiringPi
-
Execute
bpi-update -c pkglist.conf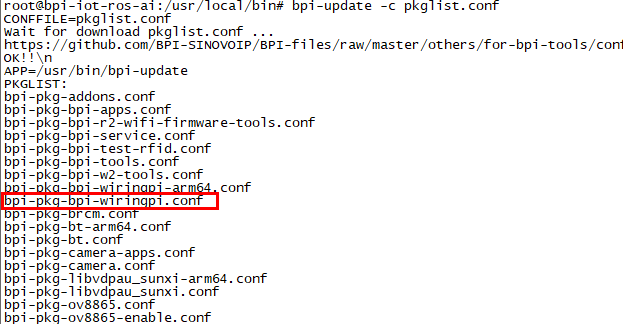
-
Execute
bpi-update -c bpi-pkg-bpi-wiringpi.conf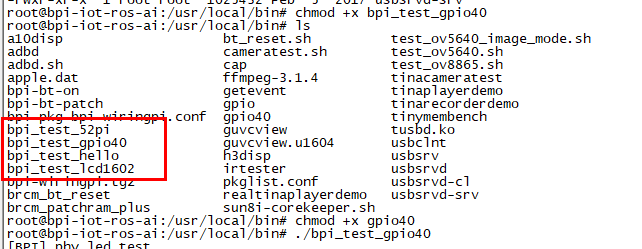
RGB 1602 LCD
-
Execute
/usr/local/bin/bpi_test_lcd1602.sh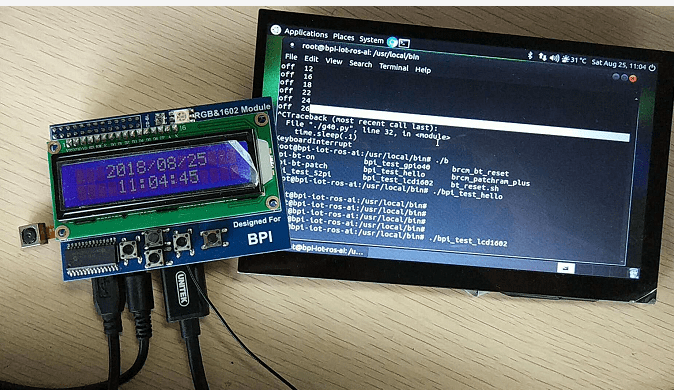
0.96 Inch OLED Display
-
Execute
/usr/local/bin/bpi_test_52pi.sh
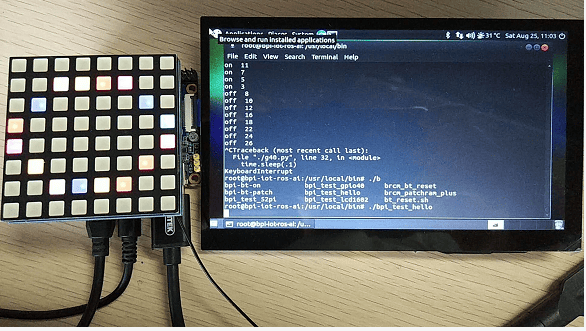
8x8 RGB LED Martix
-
Firstly you need a GPIO Extend Board for 8x8 LED Martix
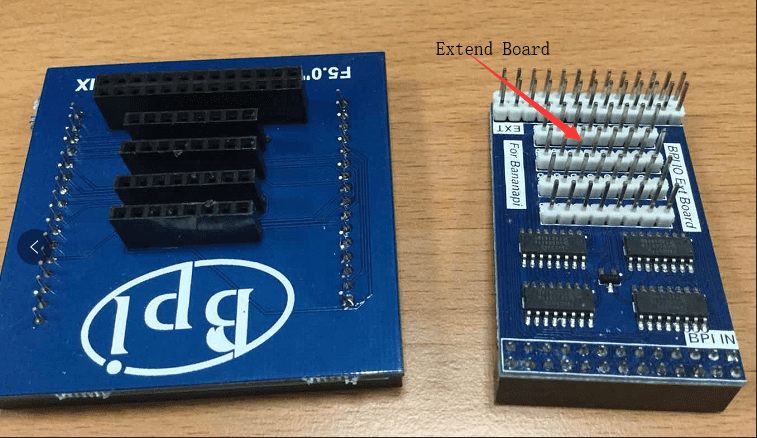
-
Execute
/usr/local/bin/bpi_test_gpio40.sh