¶ Introduction
The BPI-P2pro is powered by the Rockchip RK3308B-S, which comes with a 64-bit quad-core ARM Cortex-A35 processor, USB, Ethernet, Bluetooth, wireless connectivity and a voice detection engine.With rich audio interfaces (such as MIC/PDM/SPDIF/I2S),RK3308 is ideal product for IoT and voice applications. The BPI-p2pro uses 512MB DDR3 RAM and uses eMMC or SD card as the storage of operating system.
¶ Development
¶ Prepare
-
5V/3A type-c power supply
-
Minimum 8GB SD/TF card
-
Baud rate: 1500000
-
Debug interface:

¶ Choosing the Burning Method
| Choosing the Burning Method : Rockchip chip Flash System Image |
¶ 100M Ethernet
If you are using wired Ethernet access, please insert the network cable into the RJ45 port on ArmSoM-P2pro, and the network port light flashes,indicating hardware connected properly.
Manually configure Ethernet
Switch to root user
sudo suCheck if Ethernet is working properly with the ifconfig command, and it will display the network card eth0 and Ethernet IP address. In addition, use the ping tool to determine if the network is connected.
ifconfig
ping www.baidu.comIf unable to ping, please try
$ sudo dhclient eth0¶ Debug Serial Port
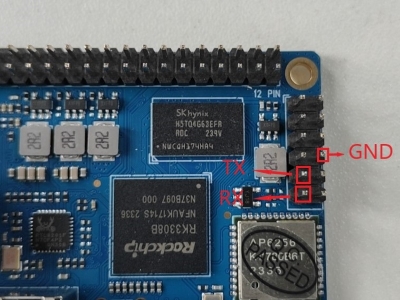
The debug serial port location is pin 9 and 11 of the 12-pin header
| P2pro | Connection | Serial Module |
|---|---|---|
GND (pin 8) |
←-→ |
GND |
TX (pin 9) |
←-→ |
RX |
RX (pin 11) |
←-→ |
TX |

¶ WiFi
If you can’t check "wlan0" with "ifconfig", that may not have loaded the driver.
-
First, execute
find / -name bcmdhd.koQuery driver’s path.
-
Then install.
insmod /system/lib/modules/bcmdhd.ko
-
After executing, "ifconfig" can see "wlan0".
¶ BT
# 1. Activate Bluetooth
root@linaro-alip:/# service bluetooth start
# 2. Enter bluetoothctl
root@linaro-alip:/# bluetoothctl
# 3. Enter the following command to connect
root@linaro-alip:/# power on
root@linaro-alip:/# agent on
root@linaro-alip:/# default-agent
root@linaro-alip:/# scan on
root@linaro-alip:/# pair yourDeviceMAC¶ Audio
View sound cards in the system:
root@linaro-alip:~# aplay -l
**** List of PLAYBACK Hardware Devices ****
card 0: rockchiprk3308a [rockchip,rk3308-acodec], device 0: dailink-multicodecs ff560000.acodec-0 [dailink-multicodecs ff560000.acodec-0]
  Subdevices: 1/1
  Subdevice #0: subdevice #0
card 7: Loopback [Loopback], device 0: Loopback PCM [Loopback PCM]
  Subdevices: 8/8
  Subdevice #0: subdevice #0
  Subdevice #1: subdevice #1
  Subdevice #2: subdevice #2
  Subdevice #3: subdevice #3
  Subdevice #4: subdevice #4
  Subdevice #5: subdevice #5
  Subdevice #6: subdevice #6
  Subdevice #7: subdevice #7
card 7: Loopback [Loopback], device 1: Loopback PCM [Loopback PCM]
  Subdevices: 8/8
  Subdevice #0: subdevice #0
  Subdevice #1: subdevice #1
  Subdevice #2: subdevice #2
  Subdevice #3: subdevice #3
  Subdevice #4: subdevice #4
  Subdevice #5: subdevice #5
  Subdevice #6: subdevice #6
Subdevice #7: subdevice #7play music
root@linaro-alip:/# aplay -D plughw:0,0 ./usr/share/sounds/alsa/Rear_Right.wav¶ USB Interface
BPI-P2 pro provides a USB 2.0 port.
¶ Mic Interface
View All Built-in Codec Gains
amixer contentsThe headphone output sound is too low
Check the current left and right channel output gain of the codec:
amixer cget name='DAC HPOUT Left Volume'
amixer cget name='DAC HPOUT Right Volume'Adjust the base gain as needed:
amixer cset name='DAC HPOUT Left Volume' 18
amixer cset name='DAC HPOUT Right Volume' 18Adjust volume (percentage):
amixer cset name='Master Playback Volume' 40recording
Mic gain adjustment for built-in codec
Group 0: mic1/mic2; Group 1: mic3/mic4; Group 2: mic5/mic6; Group 3: mic7/mic8
The prefix "ADC MIC" indicates adjustment of the linear gain of the front-stage MIC PGA
The prefix "ADC ALC" indicates adjustment of the linear gain of the back-stage ALC
amixer cset name='ADC MIC Group 0 Right Gain'  3
amixer cset name='ADC MIC Group 0 Left Gain'  3
amixer cset name='ADC ALC Group 0 Left Volume'  31
amixer cset name='ADC ALC Group 0 Right Volume'  31

amixer cset name='ADC MIC Group 1 Right Gain'  3
amixer cset name='ADC MIC Group 1 Left Gain'  3
amixer cset name='ADC ALC Group 1 Left Volume'  31
amixer cset name='ADC ALC Group 1 Right Volume'  31

amixer cset name='ADC MIC Group 2 Right Gain'  3
amixer cset name='ADC MIC Group 2 Left Gain'  3
amixer cset name='ADC ALC Group 2 Left Volume'  31
amixer cset name='ADC ALC Group 2 Right Volume'  31

amixer cset name='ADC MIC Group 3 Right Gain'  3
amixer cset name='ADC MIC Group 3 Left Gain'  3
amixer cset name='ADC ALC Group 3 Left Volume'  31
amixer cset name='ADC ALC Group 3 Right Volume'  31

export ALSA_LIB_ADD_GAIN=3

// When the sampling rate is greater than 16000hz, the recording command should add the parameters --period-size=1024 --buffer-size=4096
arecord -D hw:0,0 -c 8 -r 44100 -f S16_LE --period-size=1024 --buffer-size=4096 test.wav