
¶ Introduction
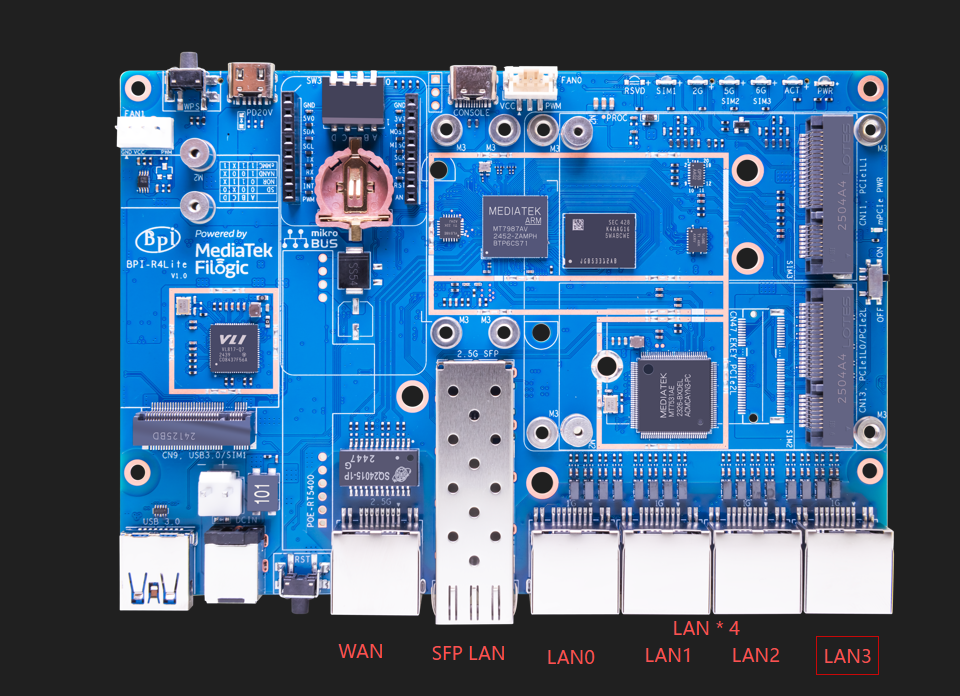
Banana Pi BPI-R4 Lite Router board with MediaTek MT7987A Quad-core Arm Cortex-A53 design ,2GB DDR4,8GB eMMC flash,256MB SPI-NAND Flash,32MB SPI-NOR Flash and Micro SD card slot onboard, also have 1x 2.5G SFP LAN, 1x 2.5G RJ45 WAN,4x 1G RJ45 LAN,with USB3.0 port,1x M.2 KEY-B slot with USB3.0 for 5G Module.1x miniPCIe slot with PCIe3.0 2lane interface for Wi-Fi 7 NIC (Option: 2x miniPCIe slots with PCIe3.0 1lane),1x miniPCIe slot with USB2.0 interfaceIt and 1x USB TypeC Debug Console. It is a very high performance open source router development board.
¶ Development
¶ Prepare
-
Prepare 8G/above TF card, USB-Serial cable, Ubuntu System
-
12V/2A power adapter (without any peripherals, The power consumption of the BPI-R4_Lite mainboard is around 3W under normal conditions. you need to determine whether you need a higher power power adapter according to your own accessory usage)
-
Using your USB TypeC Debug Console
-
link: [Download the image] to be burned
-
Default IP address for LAN port: 192.168.1.1
-
User name/password: pi/bananapi ,root/bananapi.
Or the user is root without a password. -
WIFI: AP_MTK_MT7990_2G/AP_MTK_MT7990_5G/AP_MTK_MT7990_6G
¶ BPI-R4_Lite bootstrap and device select Jumper Setting:
SW3_A and SW3_B control the signal originating from the chip MT7987:
"00" indicates booting from SD.
"01" indicates booting from NOR.
"10" indicates booting from NAND.
"11" indicates booting from eMMC.
SW3_C, via U24, selects between NAND boot and NOR boot: When SW3_C is 1, the switch physically connects to NOR. When SW3_C is 0, the switch physically connects to NAND
SW3_D, selects between SD boot and EMMC boot: When SW3_D is 1, the switch physically connects to EMMC. When SW3_D is 0, the switch physically connects to SD Card.
¶ A/B/D Jumper is "0", BPI-R4_Lite will boot from SD card
¶ A Jumper is "0" and B/C Jumper is "1", BPI-R4_Lite will boot from SPI NOR Flash
¶ A Jumper is "1" and B/C Jumper is "0", BPI-R4_Lite will boot from SPI NAND Flash
¶ A/B/D Jumper is "1",BPI-R4_Lite will boot from EMMC
¶ If the console said "system halt!", it means that the bootup storage does not cotain any OS
  F0: 102B 0000
  F9: 1042 0000
  F9: 1042 0000 [0200]
  F8: 1041 0000
  F8: 1041 0000 [0002]
  F3: 1001 0000 [0200]
  F3: 102C 0000
  F5: 480A 0031
  00: 1005 0000
  F9: 1042 0000
  F9: 1042 0000 [0200]
  F8: 1041 0000
  F8: 1001 0000 [0200]
  F3: 1001 0000
  F3: 1001 0000
  01: 102A 0001
  02: 1005 0000
  BP: 0280 00C0 [0001]
  EC: 0000 0000 [0000]
  MK: 0000 0000 [0000]
  T0: 0000 00F7 [0101]
System halt!¶ Image
The following figure is an example
As shown in the previous Boot Strapping picture:
For the image mtk-bpi-r4lite-EMMC-NAND-MP4_2-2PCIe-1L.img: Bootstrap loads from NAND, and this image is programmed into EMMC. The jumper settings should be 1001.Flashing to EMMC requires the bl2.emmc.img file.
For the image mtk-bpi-r4lite-EMMC-NOR-MP4_2-2PCIe-1L.img: Bootstrap loads from NOR, and this image is programmed into EMMC. The jumper settings should be 0111.Flashing to EMMC requires the bl2.emmc.img file.
For the image mtk-bpi-r4lite-NAND-MP4_2-2PCIe-1L.img: Bootstrap loads from SD Card, and this image is programmed into NAND. The jumper settings should be 0000.
For the image mtk-bpi-r4lite-NOR-MP4_2-2PCIe-1L.img: Bootstrap loads from SD Card, and this image is programmed into NOR. The jumper settings should be 0010.
For the image mtk-bpi-r4lite-SD-NOR-MP4_2-2PCIe-1L.img: This image on the SD card supports NOR flash but not NAND flash. Therefore, if you burn this image to an SD card and boot from it, and subsequently need to burn other images to NOR flash, you should burn this (particular) image
For the image mtk-bpi-r4lite-SD-NAND-MP4_2-2PCIe-1L.img: This image on the SD card supports NAND flash but not NOR flash. Therefore, if you burn this image to an SD card and boot from it, and subsequently need to burn other images to NAND flash, you should burn this (particular) image
¶ How to burn image to SD card
-
Windows PC,Insert the SD card into a card reader, then plug the card reader into your computer. Format the SD card, making sure not to select the "Quick Format" option.
-
Linux PC, you can use the "mksf" command for formatting, or use the "dd" command to write zeros.
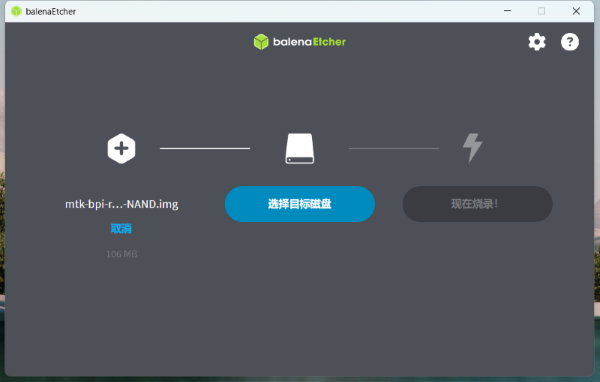
Burn image to SD card on windows computer
Balena Etcher is an opensource GUI flash tool by Balena, Flash OS images to SDcard or USB drive.
-
Click on "Flash from file" to select image.
-
Click on "Select target" to select USB device.
-
Click on "Flash!" Start burning.
Burn image to SD card on linux computer
-
You could download latest image from our forum
-
Install bpi-tools on your Ubuntu. If you can’t access this URL or any other problems, please go to bpi-tools repo and install this tools manually.
apt-get install pv curl -sL https://github.com/BPI-SINOVOIP/bpi-tools/raw/master/bpi-tools | sudo -E bash -
After you download the image, insert your TF card into your Ubuntu. Execute
bpi-copy xxx.img /dev/sdxto install image on your TF card
-
After step 3, then you can insert your TF card into R4_Lite, and press power button to setup R4_Lite
Change Boot Jumper to boot from SD, Enable SD Card Device.
¶ How to burn image to onboard NOR
| When you want to Update Nor device, Firstly Change boot switch to boot from SD device and insert one SD with SD boot Image, then after boot up,you need flash one Nor image into Nor device. Finally you change bootstrap to boot from Nor device. |
Before burning image into Nand, please prepare a USB disk. Let’s take OpenWrt image (mtk-bpi-r4lite-NOR.img ) for example, the steps are below:
-
Copy Nand boot OpenWrt image(mtk-bpi-r4lite-NOR.img) to USB disk.
-
Change boot switch Jumper, the board boot from SD device, then power up the board.
-
Plug in USB disk to the board, and mount the USB to /mnt or other directory as follows: (you can skip mounting if it is mounted automatically)
mount -t vfat /dev/sda1 /mnt cd /mnt/sda1 -
Execute following command to erase the whole Nor flash and copy image to nor device:
mtd erase /dev/mtd0 dd if=mtk-bpi-r4lite-NOR.img of=/dev/mtdblock0 -
Power off BPI-R4_Lite board, unplug u-disk driver, change bootstrap to boot from Nor device.
¶ How to burn image to onboard Nand
NAND has an image burned at the factory. If you want to use it, simply switch to the corresponding boot and then power on to start.
| When you want to Update Nand device, Firstly Change boot switch to boot from SD device and insert one SD with SD boot Image, then after boot up,you need flash one Nand image into Nand device. Finally you change bootstrap to boot from Nand device. |
Before burning image into Nand, please prepare a USB disk. Let’s take OpenWrt image (mtk-bpi-r4lite-NAND-0611.img) for example, the steps are below:
-
Copy Nand boot OpenWrt image(mtk-bpi-r4lite-NAND-0611.img) to USB disk.
-
Change boot switch Jumper, the board boot from SD device, then power up the board.
-
Plug in USB disk to the board, and mount the USB to /mnt or other directory as follows: (you can skip mounting if it is mounted automatically)
mount -t vfat /dev/sda1 /mnt cd /mnt/sda1 -
Execute following command to erase the whole Nand flash and copy image to nand device:
mtd erase /dev/mtd0 mtd write mtk-bpi-r4lite-NAND-0611.img /dev/mtd0 -
Power off BPI-R4_Lite board, unplug u-disk driver, change bootstrap to boot from Nand device.
¶ How to burn image to onboard eMMC
| Because SD card and EMMC device share one SOC’s controller, it is necessary to switch to NAND startup and then burn the EMMC image into the EMMC. Finally, you will change the boot to boot from EMMC. |
Before burning image to eMMC, please prepare a USB disk. Let’s take OpenWrt image (bl2_emmc.img, mtk-bpi-r4lite-EMMC-NAND.img) for example, the steps are below:
-
Copy EMMC boot OpenWrt image(bl2_emmc.img,mtk-bpi-r4lite-EMMC-NAND.img) to USB disk, if the image is compressed please uncompress it before copying to USB disk.
-
Change the switch jumper to Nand and start the motherboard from Nand.
-
Plug in USB disk to the board, and mount the USB to /mnt or other directory as follows: (you can skip mounting if it is mounted automatically)
mount -t vfat /dev/sda1 /mnt cd /mnt/sda1 -
Execute :
echo 0 > /sys/block/mmcblk0boot0/force_ro dd if=bl2_emmc.img of=/dev/mmcblk0boot0 dd if=mtk-bpi-r4lite-EMMC-NAND.img of=/dev/mmcblk0 mmc bootpart enable 1 1 /dev/mmcblk0 sync sync -
Power off R4_Lite board, remove u-disk driver, change bootstrap to boot from emmc device.
¶ Network-Configuration
-
Network-Configuration refer to: http://www.fw-web.de/dokuwiki/doku.php?id=en:bpi-r2:network:start
-
Network Interface: WAN port is for WAN;SFP LAN, lan0, lan1, lan2,lan3 is for LAN, ra0/ra1 is for 2.4G wireless, rai0 is for 5G wifi6 wireless, rax0 is for 6G wifi7 wireless.
root@OpenWrt:~# ifconfig
br-lan    Link encap:Ethernet  HWaddr BA:F0:A3:27:B2:53
          inet addr:10.0.6.1  Bcast:10.0.6.255  Mask:255.255.255.0
          inet6 addr: fd7f:7a27:1d87::1/60 Scope:Global
          inet6 addr: fe80::b8f0:a3ff:fe27:b253/64 Scope:Link
          UP BROADCAST RUNNING MULTICAST  MTU:1500  Metric:1
          RX packets:99527801 errors:0 dropped:0 overruns:0 frame:0
          TX packets:37709738 errors:0 dropped:0 overruns:0 carrier:0
          collisions:0 txqueuelen:1000
          RX bytes:149207799463 (138.9 GiB)  TX bytes:2498673864 (2.3 GiB)

br-wan    Link encap:Ethernet  HWaddr AA:0E:53:9B:EB:46
          inet addr:10.168.1.125  Bcast:10.168.1.255  Mask:255.255.255.0
          inet6 addr: fe80::a80e:53ff:fe9b:eb46/64 Scope:Link
          inet6 addr: fd3f:1b63:79e:0:a80e:53ff:fe9b:eb46/64 Scope:Global
          UP BROADCAST RUNNING MULTICAST  MTU:1500  Metric:1
          RX packets:34911 errors:0 dropped:0 overruns:0 frame:0
          TX packets:26689 errors:0 dropped:0 overruns:0 carrier:0
          collisions:0 txqueuelen:1000
          RX bytes:16527400 (15.7 MiB)  TX bytes:10371963 (9.8 MiB)

eth0      Link encap:Ethernet  HWaddr BA:F0:A3:27:B2:53
          inet6 addr: fe80::b8f0:a3ff:fe27:b253/64 Scope:Link
          UP BROADCAST RUNNING MULTICAST  MTU:1504  Metric:1
          RX packets:1866 errors:0 dropped:1 overruns:0 frame:0
          TX packets:6100 errors:0 dropped:0 overruns:0 carrier:0
          collisions:0 txqueuelen:1000
          RX bytes:483284 (471.9 KiB)  TX bytes:4001138 (3.8 MiB)
          Interrupt:73

eth1      Link encap:Ethernet  HWaddr AA:0E:53:9B:EB:46
          UP BROADCAST RUNNING MULTICAST  MTU:1500  Metric:1
          RX packets:3251292 errors:0 dropped:0 overruns:0 frame:1
          TX packets:19493357 errors:0 dropped:0 overruns:0 carrier:0
          collisions:0 txqueuelen:1000
          RX bytes:219561937 (209.3 MiB)  TX bytes:29475758425 (27.4 GiB)
          Interrupt:73

lan0      Link encap:Ethernet  HWaddr BA:F0:A3:27:B2:53
          UP BROADCAST MULTICAST  MTU:1500  Metric:1
          RX packets:1615 errors:0 dropped:0 overruns:0 frame:0
          TX packets:1583 errors:0 dropped:0 overruns:0 carrier:0
          collisions:0 txqueuelen:1000
          RX bytes:417484 (407.6 KiB)  TX bytes:710675 (694.0 KiB)

lan1      Link encap:Ethernet  HWaddr BA:F0:A3:27:B2:53
          UP BROADCAST MULTICAST  MTU:1500  Metric:1
          RX packets:0 errors:0 dropped:0 overruns:0 frame:0
          TX packets:0 errors:0 dropped:0 overruns:0 carrier:0
          collisions:0 txqueuelen:1000
          RX bytes:0 (0.0 B)  TX bytes:0 (0.0 B)

lan2      Link encap:Ethernet  HWaddr BA:F0:A3:27:B2:53
          UP BROADCAST MULTICAST  MTU:1500  Metric:1
          RX packets:0 errors:0 dropped:0 overruns:0 frame:0
          TX packets:0 errors:0 dropped:0 overruns:0 carrier:0
          collisions:0 txqueuelen:1000
          RX bytes:0 (0.0 B)  TX bytes:0 (0.0 B)

lan3      Link encap:Ethernet  HWaddr BA:F0:A3:27:B2:53
          UP BROADCAST MULTICAST  MTU:1500  Metric:1
          RX packets:0 errors:0 dropped:0 overruns:0 frame:0
          TX packets:0 errors:0 dropped:0 overruns:0 carrier:0
          collisions:0 txqueuelen:1000
          RX bytes:0 (0.0 B)  TX bytes:0 (0.0 B)

lan5      Link encap:Ethernet  HWaddr BA:F0:A3:27:B2:53
          UP BROADCAST RUNNING MULTICAST  MTU:1500  Metric:1
          RX packets:0 errors:0 dropped:0 overruns:0 frame:0
          TX packets:2336 errors:0 dropped:0 overruns:0 carrier:0
          collisions:0 txqueuelen:1000
          RX bytes:0 (0.0 B)  TX bytes:273011 (266.6 KiB)

lo        Link encap:Local Loopback
          inet addr:127.0.0.1  Mask:255.0.0.0
          inet6 addr: ::1/128 Scope:Host
          UP LOOPBACK RUNNING  MTU:65536  Metric:1
          RX packets:331 errors:0 dropped:0 overruns:0 frame:0
          TX packets:331 errors:0 dropped:0 overruns:0 carrier:0
          collisions:0 txqueuelen:1000
          RX bytes:89520 (87.4 KiB)  TX bytes:89520 (87.4 KiB)

ra0       Link encap:Ethernet  HWaddr 00:0C:43:26:60:88
          UP BROADCAST RUNNING MULTICAST  MTU:1500  Metric:1
          RX packets:19506966 errors:570 dropped:570 overruns:0 frame:0
          TX packets:3871107 errors:57295 dropped:57295 overruns:0 carrier:0
          collisions:0 txqueuelen:1000
          RX bytes:29798518080 (27.7 GiB)  TX bytes:253500928 (241.7 MiB)

ra1       Link encap:Ethernet  HWaddr 02:0C:43:36:60:88
          UP BROADCAST RUNNING MULTICAST  MTU:1500  Metric:1
          RX packets:0 errors:0 dropped:0 overruns:0 frame:0
          TX packets:0 errors:0 dropped:0 overruns:0 carrier:0
          collisions:0 txqueuelen:1000
          RX bytes:0 (0.0 B)  TX bytes:0 (0.0 B)

rai0      Link encap:Ethernet  HWaddr 00:0C:43:26:60:C0
          UP BROADCAST RUNNING MULTICAST  MTU:1500  Metric:1
          RX packets:99966624 errors:1084 dropped:1084 overruns:0 frame:0
          TX packets:47357921 errors:278811 dropped:278811 overruns:0 carrier:0
          collisions:0 txqueuelen:1000
          RX bytes:152961245728 (142.4 GiB)  TX bytes:3031675968 (2.8 GiB)

rax0      Link encap:Ethernet  HWaddr 00:0C:43:26:60:78
          UP BROADCAST RUNNING MULTICAST  MTU:1500  Metric:1
          RX packets:0 errors:0 dropped:0 overruns:0 frame:0
          TX packets:0 errors:0 dropped:0 overruns:0 carrier:0
          collisions:0 txqueuelen:1000
          RX bytes:0 (0.0 B)  TX bytes:0 (0.0 B)

root@OpenWrt:~# brctl show br-wan
bridge name     bridge id               STP enabled     interfaces
br-wan          7fff.aa0e539beb46       no              eth1
root@OpenWrt:~# brctl show br-lan
bridge name     bridge id               STP enabled     interfaces
br-lan          7fff.baf0a327b253       no              apclii0
                                                        apclix0
                                                        apcli0
                                                        ra1
                                                        rai0
                                                        rax0
                                                        lan2
                                                        lan0
                                                        lan5
                                                        ra0
                                                        lan3
                                                        lan1
root@OpenWrt:~#¶ 2.5G SFP LAN
| SFP-2.5G-T electrical modules supporting R3 |
¶ Accessories
¶ 4G/5G Module
¶ M.2 4G/5G Module(USB Interface)
BPI-R4_Lite supports M.2 USB Interface 4G LTE/5G Modules: Quectel EM05, RM500U-CN ,RM500Q-GL& RM520N-GL
If you want to use M.2 Cellular Module on BPI-R4_Lite:
-
Install 4G/5G Cellular Module into CN9 Slot(M.2 KEYB)
-
Inset NANOSIM Card into SIMSlot(SIM1) (pay attention to the direction)
-
Install antenna on the module
-
After powering on, it will automatically dial
| The availability of 4G/5G depends on the local carrier frequency band. |
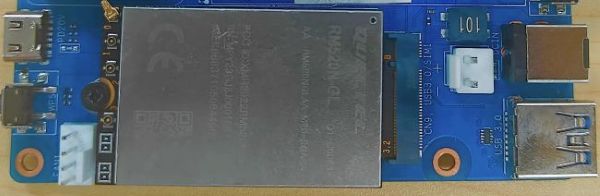
![sim1.jpg]image::/bpi-r4_lite/r4_lite-sim.png[r4_lite-sim.png](/bpi-r4_lite/sim1.jpg)
Quectel RM520N-GL
Quectel RM520N-GL
wwan0     Link encap:Ethernet  HWaddr 1A:F1:B9:87:ED:15
          inet6 addr: fe80::18f1:b9ff:fe87:ed15/64 Scope:Link
          UP RUNNING NOARP  MTU:1500  Metric:1
          RX packets:16 errors:0 dropped:0 overruns:0 frame:0
          TX packets:25 errors:0 dropped:0 overruns:0 carrier:0
          collisions:0 txqueuelen:1000
          RX bytes:5476 (5.3 KiB)  TX bytes:3668 (3.5 KiB)

wwan0_1   Link encap:Ethernet  HWaddr 1A:F1:B9:87:ED:15
          inet addr:10.6.0.91  Mask:255.255.255.248
          inet6 addr: fe80::18f1:b9ff:fe87:ed15/64 Scope:Link
          UP RUNNING NOARP  MTU:1500  Metric:1
          RX packets:21 errors:0 dropped:0 overruns:0 frame:0
          TX packets:29 errors:0 dropped:0 overruns:0 carrier:0
          collisions:0 txqueuelen:1000
          RX bytes:5570 (5.4 KiB)  TX bytes:3668 (3.5 KiB)

root@OpenWrt:/#
root@OpenWrt:/# lsusb
Bus 001 Device 002: ID 2109:2817 VIA Labs, Inc.          USB2.0 Hub
Bus 001 Device 001: ID 1d6b:0002 Linux 5.4.281 xhci-hcd xHCI Host Controller
Bus 002 Device 003: ID 2c7c:0801 Quectel RM520N-GL
Bus 002 Device 002: ID 2109:0817 VIA Labs, Inc.          USB3.0 Hub
Bus 002 Device 001: ID 1d6b:0003 Linux 5.4.281 xhci-hcd xHCI Host Controller
root@OpenWrt:/#
root@OpenWrt:/# ping www.baidu.com
PING www.baidu.com (183.2.172.177): 56 data bytes
64 bytes from 183.2.172.177: seq=0 ttl=53 time=19.850 ms
64 bytes from 183.2.172.177: seq=1 ttl=53 time=104.403 ms
64 bytes from 183.2.172.177: seq=2 ttl=53 time=63.774 ms
64 bytes from 183.2.172.177: seq=3 ttl=53 time=105.180 ms
64 bytes from 183.2.172.177: seq=4 ttl=53 time=65.546 ms
64 bytes from 183.2.172.177: seq=5 ttl=53 time=105.946 ms
^C
--- www.baidu.com ping statistics ---
6 packets transmitted, 6 packets received, 0% packet loss
round-trip min/avg/max = 19.850/77.449/105.946 ms
root@OpenWrt:/#¶ miniPCIe 4G/5G Module(USB Interface)
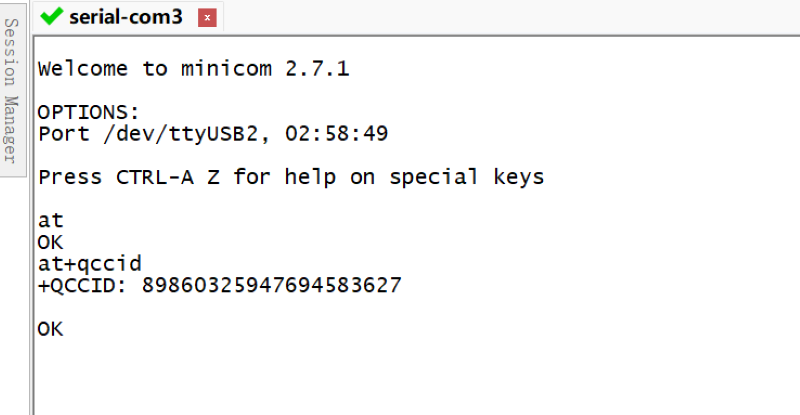
BPI-R4_Lite supports MiniPCIe USB Interface 4G LTE Module :Quectel EC25
If you want to use MiniPCIe Cellular Module on BPI-R4_Lite:
-
Install 4G Cellular Module into CN11 Slot
-
Inset NANOSIM Card into SIMSlot(SIM2) with card tray(pay attention to the direction)
-
Install antenna on the module
-
After powering on, it will automatically dial
CN13 (SIM3) is also available
| The availability of 4G depends on the local carrier frequency band. |
Due to the compatibility of the BPI-R4_Lite with Qualcomm/Unisoc modules, the EC25 module cannot directly access the DNS server and connect to the internet. Therefore, manual configuration is required to modify the default.script file via console port.
vim /usr/share/udhcpc/default.script
Add: echo "nameserver 202.96.128.86" >> /etc/resolv.conf
echo "nameserver 202.96.128.86" >> /etc/resolv.confPress the i key to enter edit mode, After completing the modifications, press the Esc key to exit edit mode. Then press Shift + :, type wq!, and press Enter to save and exit.
| Modify the IP address according to your local DNS server. |

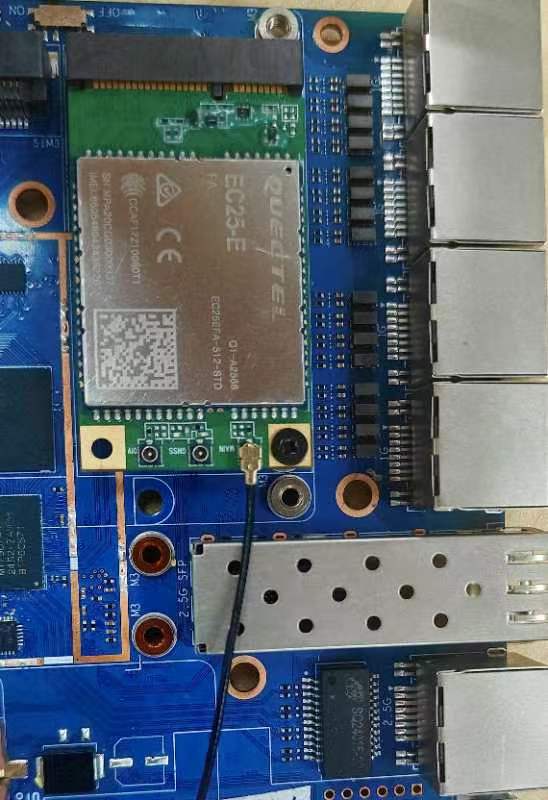
EC25-E
wwan0     Link encap:Ethernet  HWaddr 12:19:B1:54:2E:04
          inet addr:10.41.254.97  Mask:255.255.255.252
          inet6 addr: fe80::1019:b1ff:fe54:2e04/64 Scope:Link
          UP RUNNING NOARP  MTU:1500  Metric:1
          RX packets:12 errors:0 dropped:0 overruns:0 frame:0
          TX packets:24 errors:0 dropped:0 overruns:0 carrier:0
          collisions:0 txqueuelen:1000
          RX bytes:1623 (1.5 KiB)  TX bytes:2222 (2.1 KiB)

root@Simon-R4:/#
root@Simon-R4:/# lsusb
Bus 001 Device 004: ID 2c7c:0125 Android Android
Bus 002 Device 002: ID 2109:0822 VIA Labs, Inc.          USB3.1 Hub
Bus 002 Device 001: ID 1d6b:0003 Linux 5.4.260 xhci-hcd xHCI Host Controller
Bus 001 Device 003: ID 2109:8822 VIA Labs, Inc.          USB Billboard Device
Bus 001 Device 002: ID 2109:2822 VIA Labs, Inc.          USB2.0 Hub
Bus 001 Device 001: ID 1d6b:0002 Linux 5.4.260 xhci-hcd xHCI Host Controller
root@Simon-R4:/#
root@Simon-R4:/# ping www.baidu.com
PING www.baidu.com (183.2.172.42): 56 data bytes
64 bytes from 183.2.172.42: seq=0 ttl=52 time=24.309 ms
64 bytes from 183.2.172.42: seq=1 ttl=52 time=55.576 ms
64 bytes from 183.2.172.42: seq=2 ttl=52 time=55.507 ms
64 bytes from 183.2.172.42: seq=3 ttl=52 time=39.399 ms
64 bytes from 183.2.172.42: seq=4 ttl=52 time=31.386 ms
^C
--- www.baidu.com ping statistics ---
5 packets transmitted, 5 packets received, 0% packet loss
round-trip min/avg/max = 24.309/41.235/55.576 ms
root@Simon-R4:/#¶ Storage
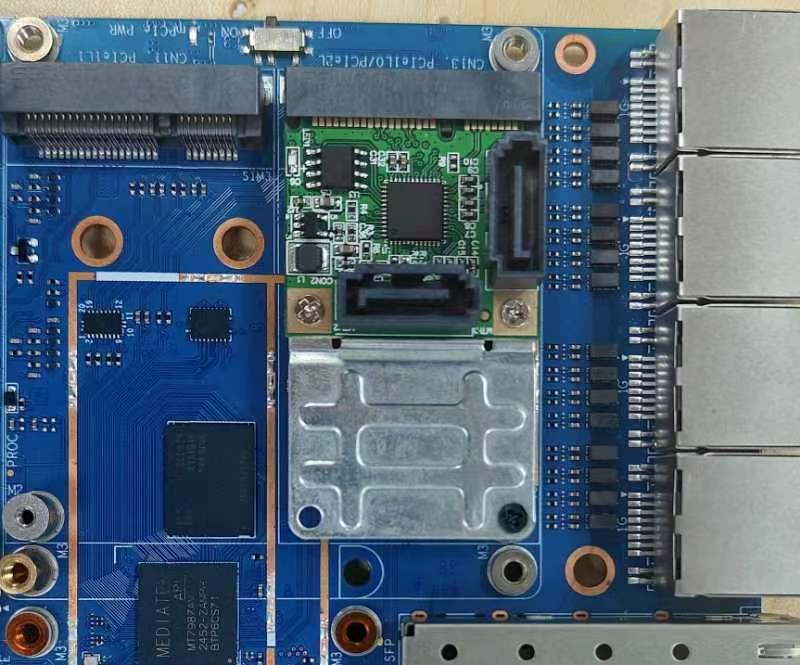
¶ PCIe to SATA
When using the PCIe to SATA or PCIe to USB, you must flash the 2PCIe-1Lane firmware image, since mPCIe A/B lanes have two configuration options: a single 2-lane interface(mPCIe A) or two separate 1-lane interfaces(mPCIe A+mPCIe B).
BPI-R4_Lite supports PCIe to SATA
root@OpenWrt:/# lspci
00:00.0 PCI bridge: MEDIATEK Corp. Device 7987 (rev 01)
01:00.0 SATA controller: ASMedia Technology Inc. ASM1062 Serial ATA Controller (rev 02)
root@OpenWrt:/#
root@OpenWrt:/#
root@OpenWrt:/# cat /proc/partitions
major minor  #blocks  name
  31        0     262144 mtdblock0
  31        1       1024 mtdblock1
  31        2        512 mtdblock2
  31        3       4096 mtdblock3
  31        4       2048 mtdblock4
  31        5     115200 mtdblock5
 253        0      60140 ubiblock0_1
root@OpenWrt:/#¶ PCIe to USB
BPI-R4_Lite Also supports PCIe to USB
root@OpenWrt:/# lspci
00:00.0 PCI bridge: MEDIATEK Corp. Device 7987 (rev 01)
01:00.0 USB controller: Renesas Technology Corp. uPD720201 USB 3.0 Host Controller (rev 03)
root@OpenWrt:/# lsusb
Bus 001 Device 002: ID 0bda:c820 Realtek 802.11ac NIC
Bus 003 Device 002: ID 2109:2817 VIA Labs, Inc.          USB2.0 Hub
Bus 002 Device 001: ID 1d6b:0003 Linux 5.4.281 xhci-hcd xHCI Host Controller
Bus 004 Device 002: ID 2109:0817 VIA Labs, Inc.          USB3.0 Hub
Bus 004 Device 001: ID 1d6b:0003 Linux 5.4.281 xhci-hcd xHCI Host Controller
Bus 001 Device 001: ID 1d6b:0002 Linux 5.4.281 xhci-hcd xHCI Host Controller
Bus 003 Device 001: ID 1d6b:0002 Linux 5.4.281 xhci-hcd xHCI Host Controller
root@R4CN:/#¶ Wi-Fi7 NIC
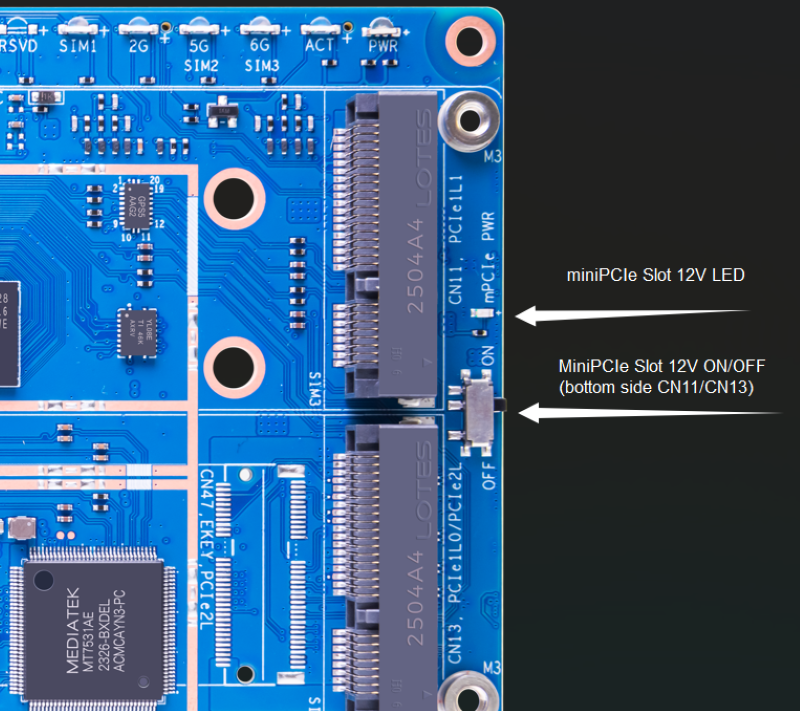
You can insert the BPI-R4-NIC into CN11 and CN13 at the bottom of BPI-R4_Lite-Main, and then fix it with two M2 screws.
When using the BPI-R4-NIC module, you must flash the 2-lane firmware image, since mPCIe A/B lanes have two configuration options: a single 2-lane interface(mPCIe A) or two separate 1-lane interfaces(mPCIe A+mPCIe B).The BPI-R4-NIC module requires 12V power supply, so the power supply on the BPI-R4_Lite-Main must be turned on before powering on (SW4 is turned to the "ON" position, and the 12V LED will lights up when power on)
| The 12V power supply will be supplied to the BPI-R4-NIC through PIN6 / 28 / 48 of the miniPCI socket. When plugging in other modules, be sure to turn off SW4 if you cannot confirm whether the module can withstand 12v. |
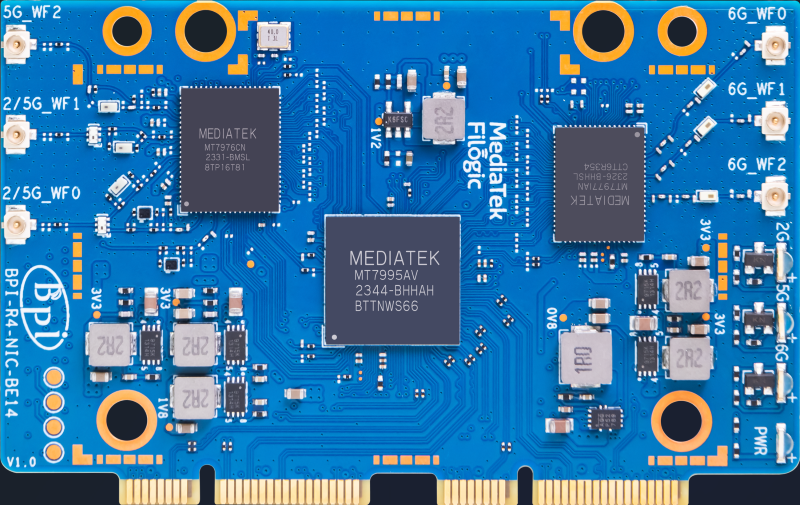
¶ BPI-R4-NIC-BE14
BPI-R4-NIC-BE14 : MT7995AV+MT7976CN+MT7977IAN
root@R4RN:/# lspci
0000:00:00.0 PCI bridge: MEDIATEK Corp. Device 7988 (rev 01)
0000:01:00.0 Network controller: MEDIATEK Corp. Device 7990
0001:00:00.0 PCI bridge: MEDIATEK Corp. Device 7988 (rev 01)
0001:01:00.0 Network controller: MEDIATEK Corp. Device 7991
0004:00:00.0 Unclassified device [0002]: MEDIATEK Corp. Device 7981

root@R4RN:/# ifconfig
ra0       Link encap:Ethernet  HWaddr 00:0C:43:26:60:A8
          UP BROADCAST RUNNING MULTICAST  MTU:1500  Metric:1
          RX packets:10 errors:10 dropped:0 overruns:0 frame:0
          TX packets:46 errors:0 dropped:0 overruns:0 carrier:0
          collisions:0 txqueuelen:1000
          RX bytes:320 (320.0 B)  TX bytes:1184 (1.1 KiB)

rai0      Link encap:Ethernet  HWaddr 00:0C:43:26:60:B8
          UP BROADCAST RUNNING MULTICAST  MTU:1500  Metric:1
          RX packets:1290969 errors:51890 dropped:0 overruns:0 frame:0
          TX packets:17549107 errors:254037 dropped:0 overruns:0 carrier:0
          collisions:0 txqueuelen:1000
          RX bytes:363742528 (346.8 MiB)  TX bytes:25491834560 (23.7 GiB)

rax0      Link encap:Ethernet  HWaddr 00:0C:43:26:60:28
          UP BROADCAST RUNNING MULTICAST  MTU:1500  Metric:1
          RX packets:563140 errors:187 dropped:0 overruns:0 frame:0
          TX packets:1683329 errors:11607 dropped:0 overruns:0 carrier:0
          collisions:0 txqueuelen:1000
RX bytes:785902144 (749.4 MiB) TX bytes:2175529280 (2.0 GiB)¶ OpenWrt
OpenWRT MTK MP4.0 WiFi Setting:
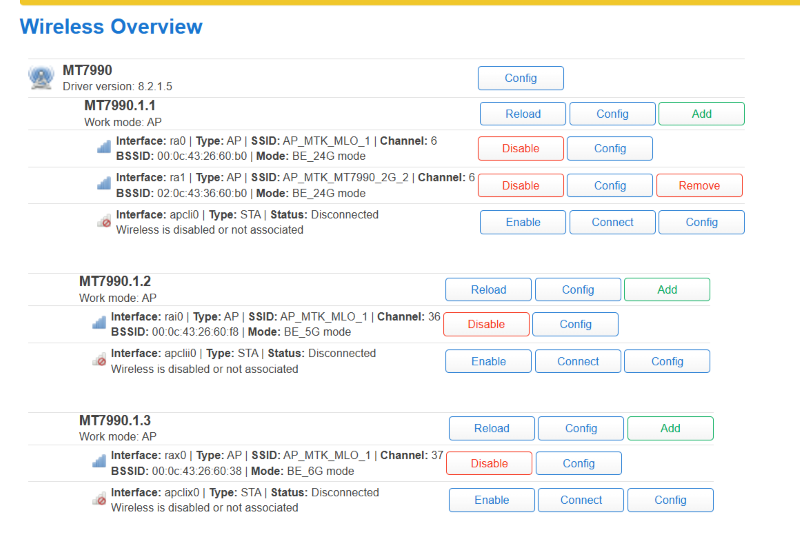
When all functions are OK, we can detect Three SSIDs and the three blue LEDs on BE14 will also light up.
You can click Config to modify the SSID and password.Then, locate the Wi-Fi with the corresponding name in the system tray (WLAN icon) at the bottom-right corner of your computer screen, enter the password, and ethernet be connected.
¶ Heat sink
MTK OpwnWRT fan with PWM control reference.
View fan script settings
root@OpenWrt:/# cat /sbin/fan-speed
#!/bin/sh /etc/rc.common

if [ ! -f /sys/class/pwm/pwmchip0/export ]; then
        exit 0
fi

### enable fan ###
echo 0 > /sys/class/pwm/pwmchip0/export
echo 10000 > /sys/class/pwm/pwmchip0/pwm0/period
echo 7000 >  /sys/class/pwm/pwmchip0/pwm0/duty_cycle
echo normal > /sys/class/pwm/pwmchip0/pwm0/polarity
echo 1 > /sys/class/pwm/pwmchip0/pwm0/enable

while :
do
        sleep 20
        result=`cat /sys/class/thermal/thermal_zone0/temp`

        temperature=$((result))
        #echo $temperature
        if [ ${temperature} -ge 53000 ]; then
                echo 5000 >  /sys/class/pwm/pwmchip0/pwm0/duty_cycle
        fi

        if [ ${temperature} -ge 62000 ]; then
                echo 1000 >  /sys/class/pwm/pwmchip0/pwm0/duty_cycle
        fi

        if [ ${temperature} -le 4800 ]; then
                echo 7000 >  /sys/class/pwm/pwmchip0/pwm0/duty_cycle
        fi

        if [ ${temperature} -le 4000 ]; then
                echo 10000 >  /sys/class/pwm/pwmchip0/pwm0/duty_cycle
        fi
done¶ How to adjust FAN speed
Disable the background running script (it auto-starts on boot; first stop the fan-speed process)
root@OpenWrt:/# ps w | grep fan
 7167 root      1324 S    /bin/sh /etc/rc.common /sbin/fan-speed
 7435 root      1244 R    grep fan
root@OpenWrt:/# kill -9 7167
root@OpenWrt:/# ps w | grep fan
7503 root 1244 S grep fanManually set PWM2 output ,duty_cycle controls fan speed; higher values increase rotation speed
root@OpenWrt:/# echo 2 > /sys/class/pwm/pwmchip0/export
root@OpenWrt:/# echo 10000 > /sys/class/pwm/pwmchip0/pwm2/period
root@OpenWrt:/# echo 5000 >  /sys/class/pwm/pwmchip0/pwm2/duty_cycle
root@OpenWrt:/# echo normal > /sys/class/pwm/pwmchip0/pwm2/polarity
root@OpenWrt:/# echo 1 > /sys/class/pwm/pwmchip0/pwm2/enable
root@OpenWrt:/#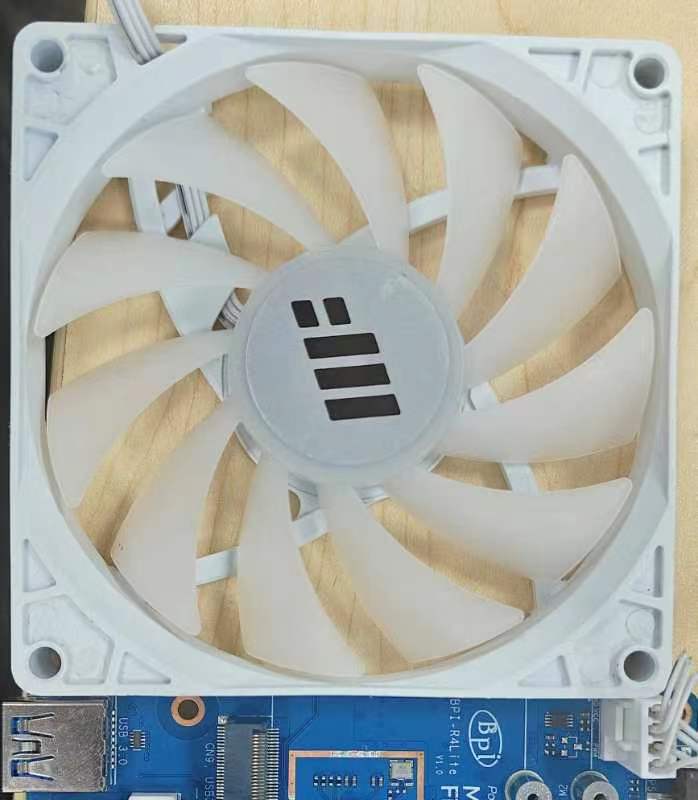
Manually set PWM2 output ,duty_cycle controls fan speed; higher values increase rotation speed
¶ 2*8 pin mikro BUS
| DO not pull down UART1_TXD when power on. |
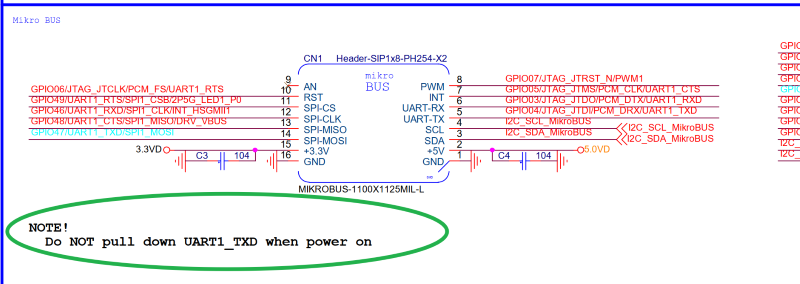
¶ GPIO Define
¶ 2x8 PIN MikroBUS (CN1)
| BPI-R4_Lite 2x8 PIN MikroBUS Header(CN1) GPIO define of BPI-R4_Lite | |||
|---|---|---|---|
BPI-R4_Lite-CON2 |
PIN |
PIN |
BPI-R4_Lite-CON2 |
GND |
1 |
2 |
5V |
SDA |
3 |
4 |
SCL |
UART-TX |
5 |
6 |
UART-RX |
INT |
7 |
8 |
PWM |
AN |
9 |
10 |
RST |
SPI-CS |
11 |
12 |
SPI-CLK |
SPI-MISO |
13 |
14 |
SPI-MOSI |
3.3V |
15 |
16 |
GND |
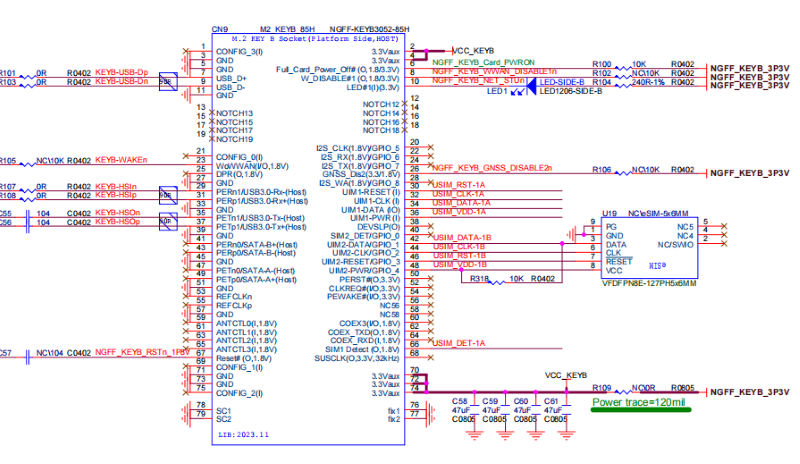
¶ BPI-R4_Lite M.2 B-KEY(CN9)
| BPI-R4_Lite M.2 B-KEY(CN19) GPIO define of BPI-R4_Lite | |||
|---|---|---|---|
BPI-R4_Lite M.2 B-KEY(CN16) |
PIN |
PIN |
BPI-R4_Lite M.2 B-KEY(CN9) |
NI |
1 |
2 |
VCC_KEYB |
GND |
3 |
4 |
VCC_KEYB |
GND |
5 |
6 |
NGFF_KEYB_Card_PWRON(10K PullUp to 3.3V) |
KEYB_USB_Dp |
7 |
8 |
NGFF_KEYB_WWAN_DISABLE1n |
KEYB_USB_Dn |
9 |
10 |
NGFF_KEYB_NET_STUN |
GND |
11 |
12 |
NOTCH |
NOTCH |
13 |
14 |
|
15 |
16 |
||
17 |
18 |
||
19 |
20 |
NI |
|
NI |
21 |
22 |
NI |
KEYB-WAKEn |
23 |
24 |
NI |
NI |
25 |
26 |
NGFF_KEYB_GNSS_DISABLE2n |
GND |
27 |
28 |
NI |
KEYB-HSln |
29 |
30 |
USIM_RST-1A |
KEYB-HSLP |
31 |
32 |
USIM_CLK-1A |
GND |
33 |
34 |
USIM_DATA-1A |
KEYB-HSOn |
35 |
36 |
USIM_VDD-1A |
KEYB-HSOp |
37 |
38 |
NI |
GND |
39 |
40 |
NI |
NI |
41 |
42 |
USIM_DATA-1B |
NI |
43 |
44 |
USIM_CLK-1B |
GND |
45 |
46 |
USIM_RST-1B |
NI |
47 |
48 |
USIM_VDD-1B |
NI |
49 |
50 |
NI |
GND |
51 |
52 |
NI |
NI |
53 |
54 |
NI |
NI |
55 |
56 |
NI |
GND |
57 |
58 |
NI |
NI |
59 |
60 |
NI |
NI |
61 |
62 |
NI |
NI |
63 |
64 |
NI |
NI |
65 |
66 |
USIM_DET-1A |
NGFF_KEYB_RSTn_1P8V |
67 |
68 |
NI |
NI |
69 |
70 |
VCC_KEYB |
GND |
71 |
72 |
VCC_KEYB |
GND |
73 |
74 |
VCC_KEYB |
NI |
75 |
76 |
GND |
GND |
77 |
78 |
GND |
GND |
79 |
||
¶ BPI-R4_Lite miniPCIe(CN11)
| BPI-R4_Lite miniPCIe(CN11) GPIO define of BPI-R4_Lite | |||
|---|---|---|---|
BPI-R4_Lite miniPCIe(CN11) |
PIN |
PIN |
BPI-R4_Lite miniPCIe(CN11) |
PCIE_B_WAKEn_3P3V |
1 |
2 |
PCIe_3V3#B |
NI |
3 |
4 |
GND |
NI |
5 |
6 |
PCIe_12V#B |
PCIE_B_CLKREQn_3P3V |
7 |
8 |
USIM_VDD-3 |
GND |
9 |
10 |
USIM_DATA-3 |
mPCIe_B_CKn |
11 |
12 |
USIM_CLK-3 |
mPCIe_B_CKp |
13 |
14 |
USIM_RST-3 |
GND |
15 |
16 |
NI |
NI |
17 |
18 |
GND |
NI |
19 |
20 |
W_DISABLE_3 |
GND |
21 |
22 |
PCIE_B_PERSTn_3P3V |
mPCIe_B_RXn |
23 |
24 |
PCIe_3V3#B |
mPCIe_B_RXP |
25 |
26 |
GND |
GND |
27 |
28 |
PCIe_12V#B |
GND |
29 |
30 |
mPCIe_B_SCL |
mPCIe_B_TXn |
31 |
32 |
mPCIe_B_SDA |
mPCIe_B_TXp |
33 |
34 |
GND |
GND |
35 |
36 |
LTE-USBDM_3 |
GND |
37 |
38 |
LTE-USBDP_3 |
PCIe_3V3#B |
39 |
40 |
GND |
PCIe_3V3#B |
41 |
42 |
SIM3-WIFI-LED-6G |
GND |
43 |
44 |
USIM_DET-3 |
NI |
45 |
46 |
mPCIe_B_LED_WPAN-3 |
NI |
47 |
48 |
PCIe_12V#B |
NI |
49 |
50 |
GND |
NI |
51 |
52 |
PCIe_3V3#B |
GND |
55 |
56 |
GND |
¶ BPI-R4_Lite miniPCIe(CN13)
| BPI-R4_Lite miniPCIe(CN13) GPIO define of BPI-R4_Lite | |||
|---|---|---|---|
BPI-R4_Lite miniPCIe(CN13) |
PIN |
PIN |
BPI-R4_Lite miniPCIe(CN13) |
PCIE_A_WAKEn_3P3V |
1 |
2 |
PCIe_3V3#A |
NI |
3 |
4 |
GND |
NI |
5 |
6 |
PCIe_12V#A |
PCIE_A_CLKREQn_3P3V |
7 |
8 |
USIM_VDD-2 |
GND |
9 |
10 |
USIM_DATA-2 |
mPCIe_A_CKn |
11 |
12 |
USIM_CLK-2 |
mPCIe_A_CKp |
13 |
14 |
USIM_RST-2 |
GND |
15 |
16 |
NI |
mPCIe_AB_RXn |
17 |
18 |
GND |
mPCIe_AB_RXn |
19 |
20 |
W_DISABLE_2 |
GND |
21 |
22 |
PCIE_A_PERSTn_3P3V |
mPCIe_A_RXn |
23 |
24 |
PCIe_3V3#A |
mPCIe_A_RXP |
25 |
26 |
GND |
GND |
27 |
28 |
PCIe_12V#A |
GND |
29 |
30 |
mPCIe_A_SCL |
mPCIe_A_TXn |
31 |
32 |
mPCIe_A_SDA |
mPCIe_A_TXp |
33 |
34 |
GND |
GND |
35 |
36 |
LTE-USBDM_2 |
GND |
37 |
38 |
LTE-USBDP_2 |
PCIe_3V3#A |
39 |
40 |
GND |
PCIe_3V3#A |
41 |
42 |
SIM2-WIFI-LED-5G |
GND |
43 |
44 |
USIM_DET-2 |
mPCIe_AB_TXn |
45 |
46 |
SIM2-WIFI-LED-2G |
mPCIe_AB_RXn |
47 |
48 |
PCIe_12V#A |
49 |
50 |
GND |
|
GND |
51 |
52 |
PCIe_3V3#A |
GND |
55 |
56 |
GND |
57 |
58 |
GND |
|
¶ BPI-R4_Lite FAN PIN (CN38)
| BPI-R4_Lite FAN(CN1,PH3A-2.54mm) of BPI-R4_Lite | |
|---|---|
+5V |
1 |
GND |
2 |
PWM2 |
3 |
¶ BPI-R4_Lite FAN PIN (CN36)
| BPI-R4_Lite FAN(CN1,PH3A-2.00mm) of BPI-R4_Lite | |
|---|---|
GND |
1 |
+12V |
2 |
NC |
3 |
PWM2 |
4 |